How to mix… for high school teachers (a starting point)

There are many guides to mixing all over the internet, YouTube, Amazon, etc – it can all be a little overwhelming if you’re a high school teacher wanting to do music technology/recording/mixing with your students.  Where do you start?

Studio One screen shot

Well, if you have the time, in my opinion the best resource is the book Mixing Secrets for the Small Studio by Mike Senior.  Of course there are many video tutorials on recording and mixing from Groove3.com and Askvideo.com as well as free guides on YouTube.  But I’m going to assume you don’t have the time to dig deeply into those excellent resources and want to do something with your students fast.

I’m not going to go into an overall picture of how to mix or get too deep, here is something I do with my year 10 and 11 students (14-15 year olds) that gets them going.

  1. If you don’t have a Digital Audio Workstation (DAW) then download Studio One Free from Presonus – it’s Mac and PC compatible (see my previous blog as to why I like this DAW).
  2. Watch this guide I’ve done about how to download and install it:
    http://youtu.be/kn6hTLC_aUs
  3. Download some multi-track audio files from the excellent Shaking Through website (direct link to “Hop Along” is below – one of my favourite episodes):
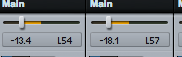
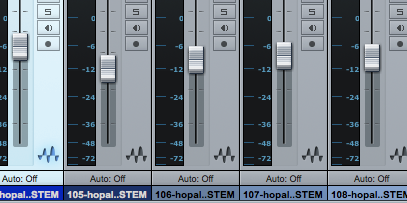
    http://weathervanemusic.org/shakingthrough/episodes/hopalongNote, you’ll need to create a free membership to download files (highly recommended).  Other excellent files you can download straight away are available from Mike Senior’s excellent website.If you’d like something more ‘orchestral’ in nature you can download these files composed by a student of mine (you can hear our final mix of it here).
  4. Drag and drop the audio files into Studio One or other DAW.  First bring up the most important instrument (probably the lead vocals) to 0dB (or unity gain).  Then balance all other tracks in proportion so that you have a rough balance.  If you’ve chosen the Hop Along track then you’ll probably do it in the order of: drums, bass, guitars, keys, BV’s, any other stuff.
    Studio One faders
  5. Pan the tracks.  Leave the most important track (vocals) down the middle along with the kick drum, snare drum and bass guitar.  Pan everything else to varying degrees left and right.
    Studio One panning
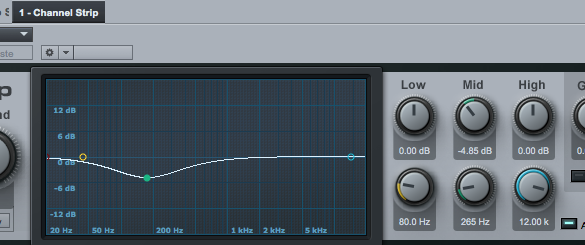
  6. You’ll now have a rough balance but things won’t quite be sitting nicely.  Now put a ‘channel strip’ (or EQ if using another DAW) plugin on each track.  You now need to cut and boost various frequency bands to take away the parts of the instrument sounds that are not important (such as mid range on a kick drum).  Try stick to just cutting frequencies, don’t boost (as sometimes making something louder makes you think it’s better when it’s really not).  By cutting ‘unnecessary’ sounds from some instruments you create space for other instruments to ‘breathe’.  A good example is to cut mid-low frequencies from the kick drum to stop it from ‘competing’ with the bass guitar for the low end.
    Studio One Channel strip
  7. As you adjust EQ don’t be afraid to go back and change your fader settings on the mixer or alter your panning.

Here is a quick video demonstrating all of the above:

That’s it.  Have your students do this with a bunch of different tracks from Shakingthough.com or Mike Senior’s excellent website.

Those of you that know a lot about mixing will be (rightly) asking… “but what about compression, reverb, gating, special FX, etc, etc?”.  Yes, those are important, but for teachers and students who are starting out mixing I think it’s best to leave it to what I’ve described above and for them to do at least 4-6 weeks on a few different sessions so they fully understand balancing faders, panning and EQ.

I’ve deliberately avoided any theory around EQ, parametric EQ’s, filters, bandwidth and other EQ technical things.  That can come later (and it’s all very important).  For now, just use your ears, and have the class compare their mixes.  Some students will be much better than others… use the strengths of those students to teach the others.

If you would like more detail around the theory of EQ’ing (which is necessary for NZ students doing Unit Standards 27703 and 28007) you can order the relevant workbooks from Learning Ideas Ltd.

Thanks,

Duncan

Effective teaching of composition

I was reading this really interesting blog the other day by Suzie Boss which looks at the research of the New Zealand education researcher and professor John Hattie and how his findings could influence Project Based Learning (this blog is well worth a read, follow the link).

There is a really interesting section of the blog:

But when it comes to evaluating the effectiveness of project-based learning (PBL), Hattie has me scratching my head. Part of the challenge is that he doesn’t focus specifically on PBL, and certainly not on PBL that is designed with an emphasis on high-quality teaching and learning. Problem-based learning winds up near the bottom of teaching effects (0.15). Inquiry-based teaching ranks a little higher (0.31), but still below the hinge point. Meanwhile, Piagetian programs, emphasizing challenges that cause learners to apply higher-order thinking and learn collaboratively (sounding similar, at least in spirit, to PBL) rank near the top (1.28).

What’s more, many of the essential components of PBL turn out to be highly effective. Formative assessment, critical for project success, comes in at 0.90. Feedback, another key to PBL, has an effect size of 0.73. Challenge and practice at the right level: 0.60. Valuing error and creating trust: 0.72. It’s hard to imagine a PBL classroom where those factors are not present.

When Hattie himself synthesizes what matters most for learning, he describes an effective classroom in language that is completely consistent with a PBL environment:

Visible teaching and learning occurs when there is deliberate practice aimed at attaining mastery of the goal, when there is feedback given and sought, and when there are active, passionate, and engaging people (teacher, students, peers) participating in the act of learning.

I imagine I’m probably like a lot of teachers (especially music teachers) in that every minute of every day is filled up with teaching, meetings, running co-curricular groups, developing resources, marking… (hands up if you’re one of those teachers to barely knows what the staff room looks like at lunchtime?).  The last thing I get time for is to look at educational theory, pedagogical techniques, etc.  Any PD I do is usually specifically musically related, rather than on a broader educational level.

So this is why I like summer holidays so much, it gives me time to look at blogs, read some Hattie, and reflect on my teaching practice.  Reading the above part of Suzie’s blog made me realise why I’m turning out to be such an effective teacher of musical composition.

I’m not trained in composition, I don’t like to compose myself, it isn’t something I was ever interested in doing as part of my study and I certainly don’t feel the need to inflict my deep angst on the world in a musical format.  But over the last five or so years my students have been showing a huge level of ‘value added’ with their results.  My good students who are passionate about composition produce great art, but I’m most pleased with those who maybe don’t have great background knowledge but end up showing a huge improvement.

Without intending to, I’ve employed many of the above methods quoted above, specifically:

  • A huge amount of formative assessment – when students have a composition due to hand in at the end of the term they must hand in their drafts at least three times over the preceding four weeks.
  • Feedback – every time students hand in a draft I give them written feedback via email and through annotating their scores (if applicable). I will try to follow this up with one-on-one verbal feedback but I find this is not very effective – too often students don’t take in what I say to them and repeat the same mistakes.  Written feedback provides them with the information that helps them make the most improvement in successive drafts and submissions.
  • Challenge and practice at the right level – even though I haven’t specifically intended to run a project based learning course (until 2015) I’ve kind of already been doing this with composition.  I provide the students many options for the basis of their composition (such as compose for film, compose for a special occasion, compose in response to an artwork, etc – and for each of these I provide multiple films, special occasions, artworks, etc).  What I find is that with these parameters students are able to jump into composing at the level they’re happy with.  I have some very advanced students who compose for full orchestra (one student this year composed a full two hour long musical – and it was really good!), some students are more comfortable composing for singer/songwriters while others compose electronic works with Apple Logic.  Everyone is working within their areas of interest and these then develop into strengths.
  • Valuing error and creating trust – this is very important to the creative process of composition.  And it features hugely in my feedback.  I try to find a balance between encouragement and correcting basic errors (mostly encouraging as composition is a very sensitive and emotionally ‘risky’ thing for students to do) but I always try to emphasise that they must ‘put themselves out there’ and take risks.  That is the only way great art will result.  This sums it up (thanks @ginippi for the image):
    10877618_10204176690032199_1572360879_n

The only other important thing that I do that isn’t mentioned (but there is probably a special Hattie term for it anyway) is modelling the creative process.  While I don’t compose great art, I do understand the compositional process and can model many ways of composing.  Showing students how to start is hugely important.  Giving them a toolbox based on practical demonstration works well.  Textbooks and handouts? – next to useless.

I’ve often felt that maybe I’m not doing a very good job with composition as I’m not presenting a formalised method each year that has me explaining concepts from the from of the class – i.e. chalk and talk.  But when I look at my NCEA results of my students and listen to their recordings I realise that isn’t the case.

As this is supposed to be a technology blog I’d better quickly mention how my students go about submitting their drafts for formative assessment.

  1. Students email me their Sibelius files (if their composition is a traditionally notation based composition) and provide a print out so I can annotate it (I used to do all printing or just write comments referencing bar numbers but I didn’t find this effective – plus printing takes up too much of my time).  If they are working on Logic or Studio One they can email me Dropbox links of their DAW session and bounced MP3’s.
  2. With the second to last draft submission I will ask students to do their own analysis of their composition.  They use Screenflow to ‘talk through’ their composition explaining why they have done what they’ve done.  As much as possible I encourage them to analyse within the context of the musical elements (timbre, form, texture, melody, harmony, etc).  By doing their own analysis of their composition its amazing how many things they’re able to fix up before I give them feedback.  This self-reflection is critical.
  3. I email back students comments and will annotate their scores if applicable.  This has to happen with 48 hours for effective learning to happen and to see a change in the draft that is due the following week.  Therefore I have to schedule into my timetable a period of marking each week and make sure nothing gets in the way of it.
  4. For the final submission I make sure I scan the annotated scores and keep a copy for internal and external moderation of my marking.  It’s really important students get their work back to help them improve for future years of study.

If you want to hear some of my students work, the musical I mentioned above (“Suspect”) is now available on iTunes.

suspect banner

The Seven Sharp programme from TV1 did a really interesting article that you can view by clicking here.

I know people may have suggestions for improvement around student submissions other than email & Dropbox (Moodle, Google Hangout, One Note, etc?) so please comment below if you think it can be done better.

Thanks,

Duncan 🙂

10 great resources for teaching recording and mixing to high school students

In New Zealand we now have the wonderful opportunity to teach recording and mixing skills to high school students.  We have Unit Standards that allow us to assess and provide credits towards a course of work in the area of Performing Arts Technology and Music Technology.
However, these Unit Standards only tell us the ‘outcomes’, not the pathways teachers should follow to teach the students to the info and develop the skills.
For NZ teachers I’ve produced a series of resources (documents, tutorial videos, eBooks, assessment schedules, etc) that are written specifically for the NZ system (although the resources are generic enough to be of assistance to anyone wanting to learn about recording and mixing).  These can all be found at www.learningideas.co.nz.
IMG_0200
However, there are many other fantastic resources available that can help teach students about recording and mixing.
  1. Alan Parsons Art and Science of Sound.  This is a fantastic DVD series and covers all the basics of recording instruments and provides great background theory on the developing of recording technology.  The chapters on mixing are very weak though but the videos on recording are gold.  A new accompanying book has also just been released and is available at Amazon.
  2. Mixing Secrets For the Small Studio by Mike Senior – while this might be a hard read for students I’ve not come across anything that explains the concepts of mixing as well as this.  It’s all too easy to use presets on plugins thinking that they will provide you with a good mix (FYI, presets are never the answer!).  This book goes way beyond that showing you how to approach the mix for each song along with the specifics of the techniques for using EQ, Compression, etc.  I’ve bought this book twice as well as on Kindle I love it so much!
  3. Shakingthrough.com – This is an amazing website for a recording studio (Weathervane Records) that records artists but also documents the process from a technical/recording viewpoint as well as a creative/compositional viewpoint.  All tracks of songs featured in the videos are available for download so you can practise your mixing chops.
    They have just released a new educational course in mixing.  I’ll be using this with my students in 2015 so I’ll write blogs about how well it works.
  4. How To Listen app from Harmon – a great tool for teaching students to associate frequency boosts and cuts on EQ with Hz numbers.  This app helps to train their ears to listen critically to frequency ranges and to learn to associate descriptions with those ranges.  Also worthy of a mention is the “hearEQ” app for iOS available on the app store.
  5. hearEQ for iOS from the app store – another brilliant ear training tool – especially it’s ‘learn’ feature which allows you to boost and cut various frequencies of any song in your iTunes library.  Also worthy of a mention is “Quiztones” also available from the App store.
  6. Recording Secrets for the Small Studio by Mike Senior – probably a better book for advanced students who already understand the basics of recording techniques.  This book is excellent at giving tips for recording in less than ideal environments (which most schools are stuck with as very few schools can afford purpose built studios with excellent acoustics).  What is also really great about this book though is the advice that Mike gives with regards to working with performers and how to get the best out of them.  Overall, full of wise advice from one of the best people in the business.
  7. Soundonsound.com – this website (and associated magazine) is the best recording/mixing magazine out there.  It’s the best way of staying up to date with the latest releases in music technology equipment.  Articles are well written and full of practical advice.
  8. Pensados Place – Definitely for more advanced students and teachers… this fascinating production from Dave Pensado, one of the top mixing engineers in the music industry, regularly interviews the top mixing engineers, performers and producers.  The insights into the creative process from people who are at the top of their game and the best in the LA, NYC and Nashville music scenes is really fascinating.  Also great is the “Into the Lair” segment where Dave provides really clever (and often advanced) mixing techniques.
  9. Groove3.com – this website provides excellent video tutorials for all the major DAW’s.  You can pretty much learn everything you need to know for any DAW (like Pro Tools, Studio One, Logic, etc) by watching these 2-3 hour tutorials.  Add in another 3-4 hours of working on what is shown in the videos and inside a day you can get up and running with any DAW.
  10. Live Audio Basics DVD from Down2Earth – this can be pretty painful to watch (I wonder if Americans find it as painful to watch as my students and I do? – could be a cultural thing?) but the content and clarity with which live PA systems are explained is the best I’ve seen.  Yes, the focus is on live PA (and this is supposed to be a blog about recording and mixing resources) but their explanation on signal flow, maintaining Unity Gain, Aux/buss sends,etc are brilliant and all vitally important to recording systems as well.
IMG_0108
I have other resources I use as well, but these are my top ten (of course aside from the resources I’ve written available at http://www.learningideas.co.nz).  Go ahead and list your favourites in the comments section.  I know there are a lot of great websites out there so feel free to list them.
Happy new year!  May your 2015 be full of creative goodness!

What is the best DAW for schools?

Just so everyone is on the same page… a DAW (or Digital Audio Workstation) is the software on a computer that you use to record and mix audio and MIDI.  With the dramatic increase in computing power combined with falling costs now anyone can have a fully fledged recording and mixing system on their computer (or iPad or iPhone!).

In the past it was too expensive for schools to have recording systems (after all, who can afford an SSL, Neve or API mixing desk?) but now with cheap microphones and interfaces made in China, combined with powerful (and relatively cheap) computers any high school music department can have a recording ‘studio’.

The Control Room at Orange Studios in Christchurch, NZ.

So… what DAW or recording/mixing software should schools use?  There are so many options.

Here is your answer… Studio One Free from Presonus.

Why?  Here are my reasons:

  • It’s free (for the basic version) – students can download it to their own laptops and home computers right away and get playing around with it.
  • It’s cross platform – i.e. it works the same on Mac and Windows computers.  Therefore teachers can be assured that all students are working on the same software so they don’t need to know how to use multiple pieces of software.
  • It comes with good MIDI instruments so students can plug in a MIDI keyboard or other controller and get recording very quickly.
  • If you want to see how quickly you can download, install and record with it I’ve made a quick overview video that you can see here:

Some commons questions I get from teachers at workshops when I say this:

  1. So why not Garageband?  Well… I love Garageband (it is actually better than Studio One Free in many ways), but it only works on Mac computers so if you have students in your class with Windows laptops it creates issues in that you’ll have some students on Studio One and some on Garageband.  Many teachers are fine with that so if you’re one of those go for it (I have students using both DAW’s) but in the interest of keeping things simple… it’s probably best to keep all students on the same software.
  2. Why not Pro Tools… isn’t that industry standard?  Yes it is.  It’s my personal DAW of choice.  But it’s sooooo expensive!!  No way most high schools can afford it.  I had 12 Pro Tools 001, 002 and Mbox systems at an old school (an investment of around $15,000 at the time) and all those systems a long time ago became obsolete.  Pro Tools is much better now that you don’t have to have AVID/Digidesign hardware to use it, but for the software it’s still too expensive in my opinion.
  3. Why not Apple Logic Pro?  I also love Logic and it is now amazingly cheap.  But once again… Mac only.
  4. Why not Reaper… isn’t that also free?  I’ll get into this more below.
  5. Why not… blah blah blah?  There are many DAW’s out there and if you as the teacher are more comfortable in teaching those to your students (and your students can afford it) then go with them.  But if you’re new to this… stick with Studio One.

So what about Reaper?

Reaper is awesome.  It’s not exactly free, it just has an unlimited trial period.  But you can purchase it for your school at incredibly cheap prices (non-commercial licences are only $60 USD but you can get it cheaper if you purchase in bulk as an educational institution).  But, for working with MIDI keyboards (which is a big part of the level 1 Music Technology Unit Standards in New Zealand) it has proven to be too complicated for many teachers to setup… which is why I suggest Studio One.

For NZ teachers who are using the ‘SOND’ unit standards, 26687, 27703 and 28007 Reaper is probably a better bet.  For the level 2 and 3 standards your students need to be using fully parametric EQ’s and compressors that have ratio, threshold, attack/release and knee controls.  Studio One Free doesn’t allow you to use EQ’s and compressors (although the paid versions of Studio One that you can see outlined here do allow you to use better EQ’s and compressors) which is why if you’re wanting to stay with ‘free’ software, Reaper is a great choice.

So in summary…

  • In setting up a music technology programme at your school that uses MIDI (such as NZ schools wanting to teach the level 1 ‘MUSTEC’ standards 27656 and 27658) download Studio One Free.
  • If you’re an NZ school wanting to offer the ‘SOND’ standards 26687, 27703 and 28007 either buy Studio One Artist upgrade ($93NZD per licence currently…edu discounts may be available by emailing Presonus) or use Reaper (unlimited trial or purchase at very cheap prices).
  • If you are a school that is wanting to offer a full on studio experience then it’s probably advisable to purchase Pro Tools, Logic and Studio One Pro eventually.  But before you spend any money make sure you are absolutely certain that you need them, it’s very easy to waste money on software you hardly use!

Any suggestions or disagreements?  Please use the comments section to give your opinions on what you’ve found works well in schools.  But before you do, please ensure that the opinions you share are based on actual classroom and student experience.  I’ve had people in the past say that you must use Pro Tools with students as that is what is in pro studios and tertiary institutions, but when I’ve dug further I’ve found out these people have never taught in high schools let alone have had to juggle limited financial restrictions that most high schools struggle with.  What we are teaching should be recording and mixing, which can be done on any decent DAW.  Skills are easily transferable between software platforms.

Anyway, enough of my soapbox, let me hear what you have to say.

Oh, btw, Merry Christmas.

Duncan

Welcome to my new blog

IMG_0060

Hi there,

I’m a teacher of high school music in New Zealand who really loves music technology and the opportunities it is opening up for students.

I’m constantly experimenting with new technologies and teaching methods.  Some of these I get to share on teacher professional development sessions I run.  Feedback I get from teachers is that they find the information and teaching and assessment concepts really great, just a little overwhelming.

So this blog will be the way I share the new things I’m doing, the new technologies I come across that can assist teaching and hopefully provide a forum for other teachers to share their ideas.

A recent blog that was published about me and all the ways I used technology in the composition and production of an original school music (“Suspect”) can be found here:

http://eblog.stac.school.nz/2014/10/23/suspect-the-murder-mystery-musical/

(btw, if you want to hear the music of “Suspect” you can purchase it on iTunes).

Over the next few weeks (well, once Christmas is out of the way…) I’ll be documenting my journey in creating a project based learning course for my year 13 students that I’ll be running in 2015.

In the standards based assessment system that we use in New Zealand (NCEA) I find my students are at times more concerned with ticking the boxes of assessment requirements rather than being concerned about the information and skills they are learning.  Running a music course in which students choose their focus and work on major projects through the year is my attempt to get students passionate about learning, developing their craft and producing great art!

If you’re a music teacher make sure you check out my website http://www.learningideas.co.nz where you can purchase Ear Training and Music Technology resources.  These are specifically written for the New Zealand curriculum and assessment system but teachers in other countries do find them very useful.

Duncan 🙂