Garageband – serious DAW or a toy?

This week I’m lucky enough to be attending the Apple Distinguished Educators Institute in Singapore.

Yesterday I enjoyed lunch with the Heads of the Development teams for iMovie and Garageband.  They were both very inspirational in their presentation but at the same time kind, down to earth and accessible.

I’ve done recent posts extolling the wonders of the new Pro Tools First mainly because it is free, cross platform (which many schools may require) and comes with excellent MIDI instruments and reverb, compression and EQ plugins.

However, there are many schools that are lucky enough to be Mac only (yes – big bias coming through here – but that is only because I’m very much over finding that our MIDI keyboards and audio interfaces don’t play nicely with the myriad of Windows devices kids bring to my school).  For these schools the logical solution for them in running a music technology course is Garageband.

So I thought I’d do a bit of a post showing why Garageband really is one of the best pieces of software around and how it can be useful for NZ teachers doing the Performing Arts Technology at level 2 and above.

Plugins

When you highlight a track and press this button:

Screen Shot 2015-08-05 at 12.20.09 pm

you end up with controls to do broad changes to your sound.  Now, these are excellent.  But for level 2 SOND standards and above you need more control.  You need to be able to change the threshold of the compressor, the ratio, change reverb levels, work with parametric EQ.

Screen Shot 2015-08-05 at 12.20.14 pm

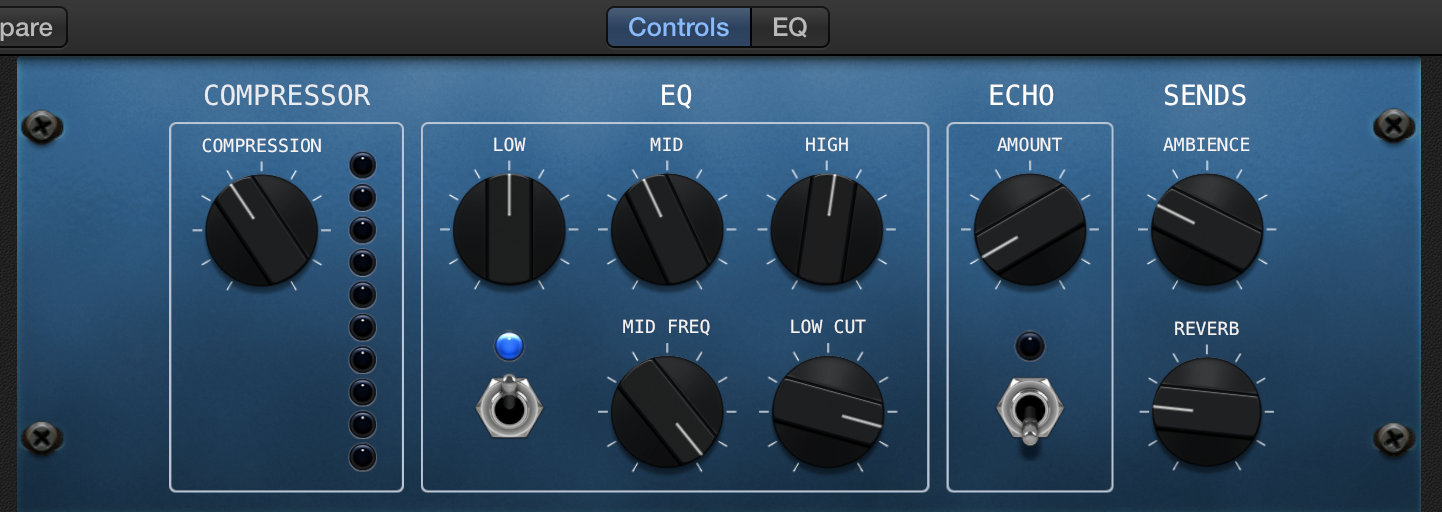
Initially it may seem that you can’t do this… until you press this button

Screen Shot 2015-08-05 at 12.21.22 pm

which shows you a plugin menu:

Screen Shot 2015-08-05 at 12.21.52 pm

Here you are able to open the individual plugins which contribute towards the first user interface that you saw, and in here you can customise pretty much anything you need to.  And it sounds great!!!  Remember, these are the same plugins that are in Logic, just packed slightly different to seem less intimidating.  There are a few features missing from what you’d get with Logic (such as ability to control and knee or release in a compressor) but most of what you need is there.

Screen Shot 2015-08-05 at 12.22.08 pm

If you’ve created a guitar track then it’s the same scenario, you’re able to see the pedal board, amp selection and all other aspects that go into making that particular sound.

Screen Shot 2015-08-05 at 12.28.03 pm

And we don’t have time to get too far into the Drummer feature here but needless to say, it really is an amazing feature.

Screen Shot 2015-08-05 at 12.29.02 pm

So when you dig a little deeper, you can see that Garageband is far from a toy.  It is a serious DAW and completely usable for all of the SOND standards.  Where you might find you have some issues is when it comes to editing audio to improve the performance.  Here it may be a little clunky… but still possible.  Pro Tools First would definitely have the edge here so level 3 SOND students may want to try both DAW’s and see what works for them.

The guys from Apple shared some really exciting news about the next release of Garageband (which I’d better not share here) which will make the fact that this is a free piece of software even more amazing!

Watch this space for a full review of the new Garageband when it comes out later in the year!

Duncan

A fantastic DAW for Music Technology teachers…

Late last year I did a post stating that for New Zealand Music Technology teachers one of the best Digital Audio Workstation (DAW) to use was Studio One Free from Presonus (along with Garageband and a few other choices).  Pretty much straight after doing that post AVID announced that they were producing a free version of their industry standard software, Pro Tools. Well… it’s taken them six months to finally release it (I was wondering if it was going to be vapourware) but Pro Tools First is now here.  You don’t seem to be able to download it from the website straight away.  You have to subscribe on the website and they will send you an email with the download link. After a very short time of playing around with it I’m 80% certain I can now recommend it to NZ teachers as the best software for teaching music technology with the MUSTEC Unit Standards (27656, 27658, 23730) and SOND Unit Standards (26687, 27703, 28007). I’m not doing to give it a complete endorsement until I get into the school term and have tested it with a bunch of students on a bunch of different computers but for now here is why I think it’s going to be the best option for NZ students doing the above Unit Standards:

  • It’s free!
  • It is very similar to the full version of Pro Tools, which is the worlds most popular DAW for recording studios movie post-production.
  • It works on both Mac and Windows
  • It includes high quality, fully functional 7-band parametric EQ, compression/limiting, gates & expanders, reverb, delay, etc
  • It includes Xpand 2, a high quality software synthesiser/sound library that provides all the necessary instruments to do the MIDI requirements of the MUSTEC standards

PT First Edit Window

So, how are these features specifically better that other options for school teachers? (note, I’m not comparing it to software like Logic, Cubase, Pro Tools HD, etc as these all cost too much money for most schools).

Presonus Studio One Free – this is severely limiting in the plugins it provides.  Therefore you can not use this software for 27703 and 28007.  It has a great software synth for level 1 MUSTEC/MIDI but it’s not a good choice of software for level 2 and above.  Please note, Studio One has recently been updated to version 3 and their new free version, Studio One Prime, has not yet been released.

Garageband – this is Mac only.  If you have Mac’s then it’s probably the best solution for your school as it’s likely your students will be very comfortable using it and it has a low learning curve.  If you’re in a Windows and Mac environment then it’s good to still use but teachers may prefer to keep things simple and use one piece of software across both platforms.

Reaper – this isn’t strictly free (it has a never-ending evaluation period) but it does provide great plugins (including EQ, compression, reverb, etc).  However, it doesn’t ship with very good software synth options for working with MIDI.  You have to install third party options.  While I have provided instructions how to use this with third party synths (like IK Multimedia’s SampleTank Free) in my MUSTEC 1 27656 resource many teachers have found it quite confusing (which is why I amended that resource to include Studio One free Tutorials). So is Pro Tools First the ultimate option for teaching music tech/recording in NZ high schools?  Quite possibly, however like most things in life, there are a few catches:

  • You have to create an AVID account which stores the sessions in the Cloud.  I’m not sure what kind of strain this will place on school wifi networks but I’ll be interested to test it over the coming weeks.
  • You can only have three projects going at once.  However, you can delete old projects which will free up a space.  I think they will allow the option to purchase more project ‘slots’ in the AVID Marketplace but personally I don’t think this will be necessary, students just have to be good about finishing projects before starting new ones.
  • You can’t use any 3rd party plugins with it.  But as mentioned above, the included plugins are excellent so they’re not required for teaching purposes.

I’m sure there may be some other negatives but these are not apparent to me as yet.  No doubt students will find problems for me! I’ve done a little video demonstrating setting it up and recording some basic MIDI and audio with it:

I’d love to hear from other teachers and students about their experiences with Pro Tools First.  Please give it a go and come back here to post comments about your experiences.

Thanks,

Duncan

UPDATE SEPTEMBER 2016 – Hi there, well I’ve now been using Pro Tools First with students for the last year and I have to say… be very careful with it!  It is so buggy, it is constantly crashing and my students have had real problems with it.  It’s such a shame as on paper it really does look like the best DAW for students.  I have had students complete assignments on it but it has been tough going.  Some students with two year old laptops had to give up and switch over to Reaper or Studio One.

Anyway, it’s free to try so if you can download it and get it working then everything I’ve written above still stands.  It will be great for you.

Collaborative Composition in Music – Project Based Learning

Over the last five weeks I’ve been trying a new way of running collaborative composition in my year 10 Option Music class.

This year I’ve been blessed to have a large class of highly motivated and talented students, so they were the perfect class to take a risk and jump into what is for me a new way of teaching composition.

The basic summary of what we did is that I divided the class into five groups.  In the first week each group had to start writing and recording a song (in a rough demo format).  In the 2nd week the groups swapped songs and continued on with what another group had started the previous week.  We did this for five weeks so that in the end, every group had been involved in the composition process on each of the five songs.

Initially the students were very nervous about this process as I’d done very little in terms of how to actually write songs.  However, that didn’t worry me as within each group of five members I knew that there were people with various strengths that when combined would make the process go smoothly.

Prior to this we had done a little work on what makes a good chord progression (mainly analysing four chord songs) and an effective melody but within the context of their own personal compositions, which they recorded/sequenced in either Garageband (Mac users) or Studio One Free (Windows users).  It wasn’t much, but it proved to be enough to get the students on the way with the process.  What was critical to the process though (which I didn’t realise until we got a few weeks into the process) was that a strong knowledge of how to use technology and specifically MIDI keyboards/guitars with software sequencers made all the difference to the success of students being able to pass on their work to the next group (only a few students in the class had strong notation/theory skills so technology bridged the gap very effectively).

Here is a little video where I show one of the songs and how each group contributed towards it week by week:

And here some of the songs created by the students (please keep in mind that these are only supposed to be at ‘demo’ quality… we still intend to record them properly at a later date):

This whole process has been an incredibly empowering experience for the students and is a great demonstration of the high end of the SAMR model:

SAMR

Software like Garageband and Studio One has enabled students to achieved a huge amount in a very short time and made it possible for this separate group collaborative thing to happen.  Students that recorded audio onto iPhones or wrote down music with traditional notation were no where near as effective in the sharing of their music with others.  By far the best way for this process to succeed was for students to compose using MIDI for the instruments and microphones/audio for the vocals… all along with a click so the music could be easily edited and rearranged by different groups.

Here are a couple of short videos watching students in action as they were creating their songs:

For other teachers who are wanting to run this sort of unit I’ve found that the following will make the process go very well:

  • Ensure that each group has at least one person who plays the following instruments: piano, guitar, drums, voice.  Often drummers don’t have a huge amount to do in the first week or two but as the weeks went by I discovered they were increasingly taking charge of the projects… running the technology (i.e. the computer DAW/sequencer)… which was critical when it came to restructuring ideas previous groups had come up with into coherent song structure of intros, verses, choruses, etc
  • Try and have a computer with a MIDI keyboard and a microphone setup in each room.  If you are using student laptops instead make sure you have a dedicated USB drive that holds the files that they work off… minimise copying of files between computers.  We ended up a losing a complete work from one room that students were working in as they mistakingly copied the wrong files then deleted the proper one.  The most successful songs were those that came out of rooms that had dedicated computers that students used each week.
  • Use the note pad facilities of your DAW (like Garageband or Logic) for writing down chord progressions, lyrics, ideas, etc  Don’t have things on scraps of paper as they may get lost.  Keeping everything with the DAW file is an elegant solution for keeping everything in the same place.
  • Don’t record piano/guitar ideas as audio… try to record them as MIDI.  This will enable successive groups to edit what was recorded.  If it’s audio, they’re stuck with it and are unable to improve upon it.

For me this process has been such an eye opener.  The students surprised themselves with what they could come up with.  The loved the process (they always arrived early from lunch so they could start as quickly as they could) and they grew so much as the weeks went by.

I will be making sure that this way of composing will be incorporated to NCEA composition at our school.  It will grow the numbers of students taking music and will help to break down the perception that you must be an orchestral musician who has been learning since you’re seven years old to be able to succeed in NCEA (even after five years at my school I’m still trying to destroy this myth!).

But overall… it was a heck of a lot of fun.  And that is what teaching and learning should be… shouldn’t it?