Collaborative Composition between primary and secondary students

I want students to develop a love of learning, music and creation. Not just to bank NCEA credits. Therefore I deliberately get them to do tasks that are not assessed. They are pushed hard to focus on NCEA assessment in all their other subjects so they are very much in the habit of focusing on the results, and not the process.

My year 12 music students completed their two songs/compositions as required by NCEA by the end of term 2. As I did not want to stop creativity in my class just because we’d met the requirements for NCEA I decided to get them to do group compositions, but with a twist.

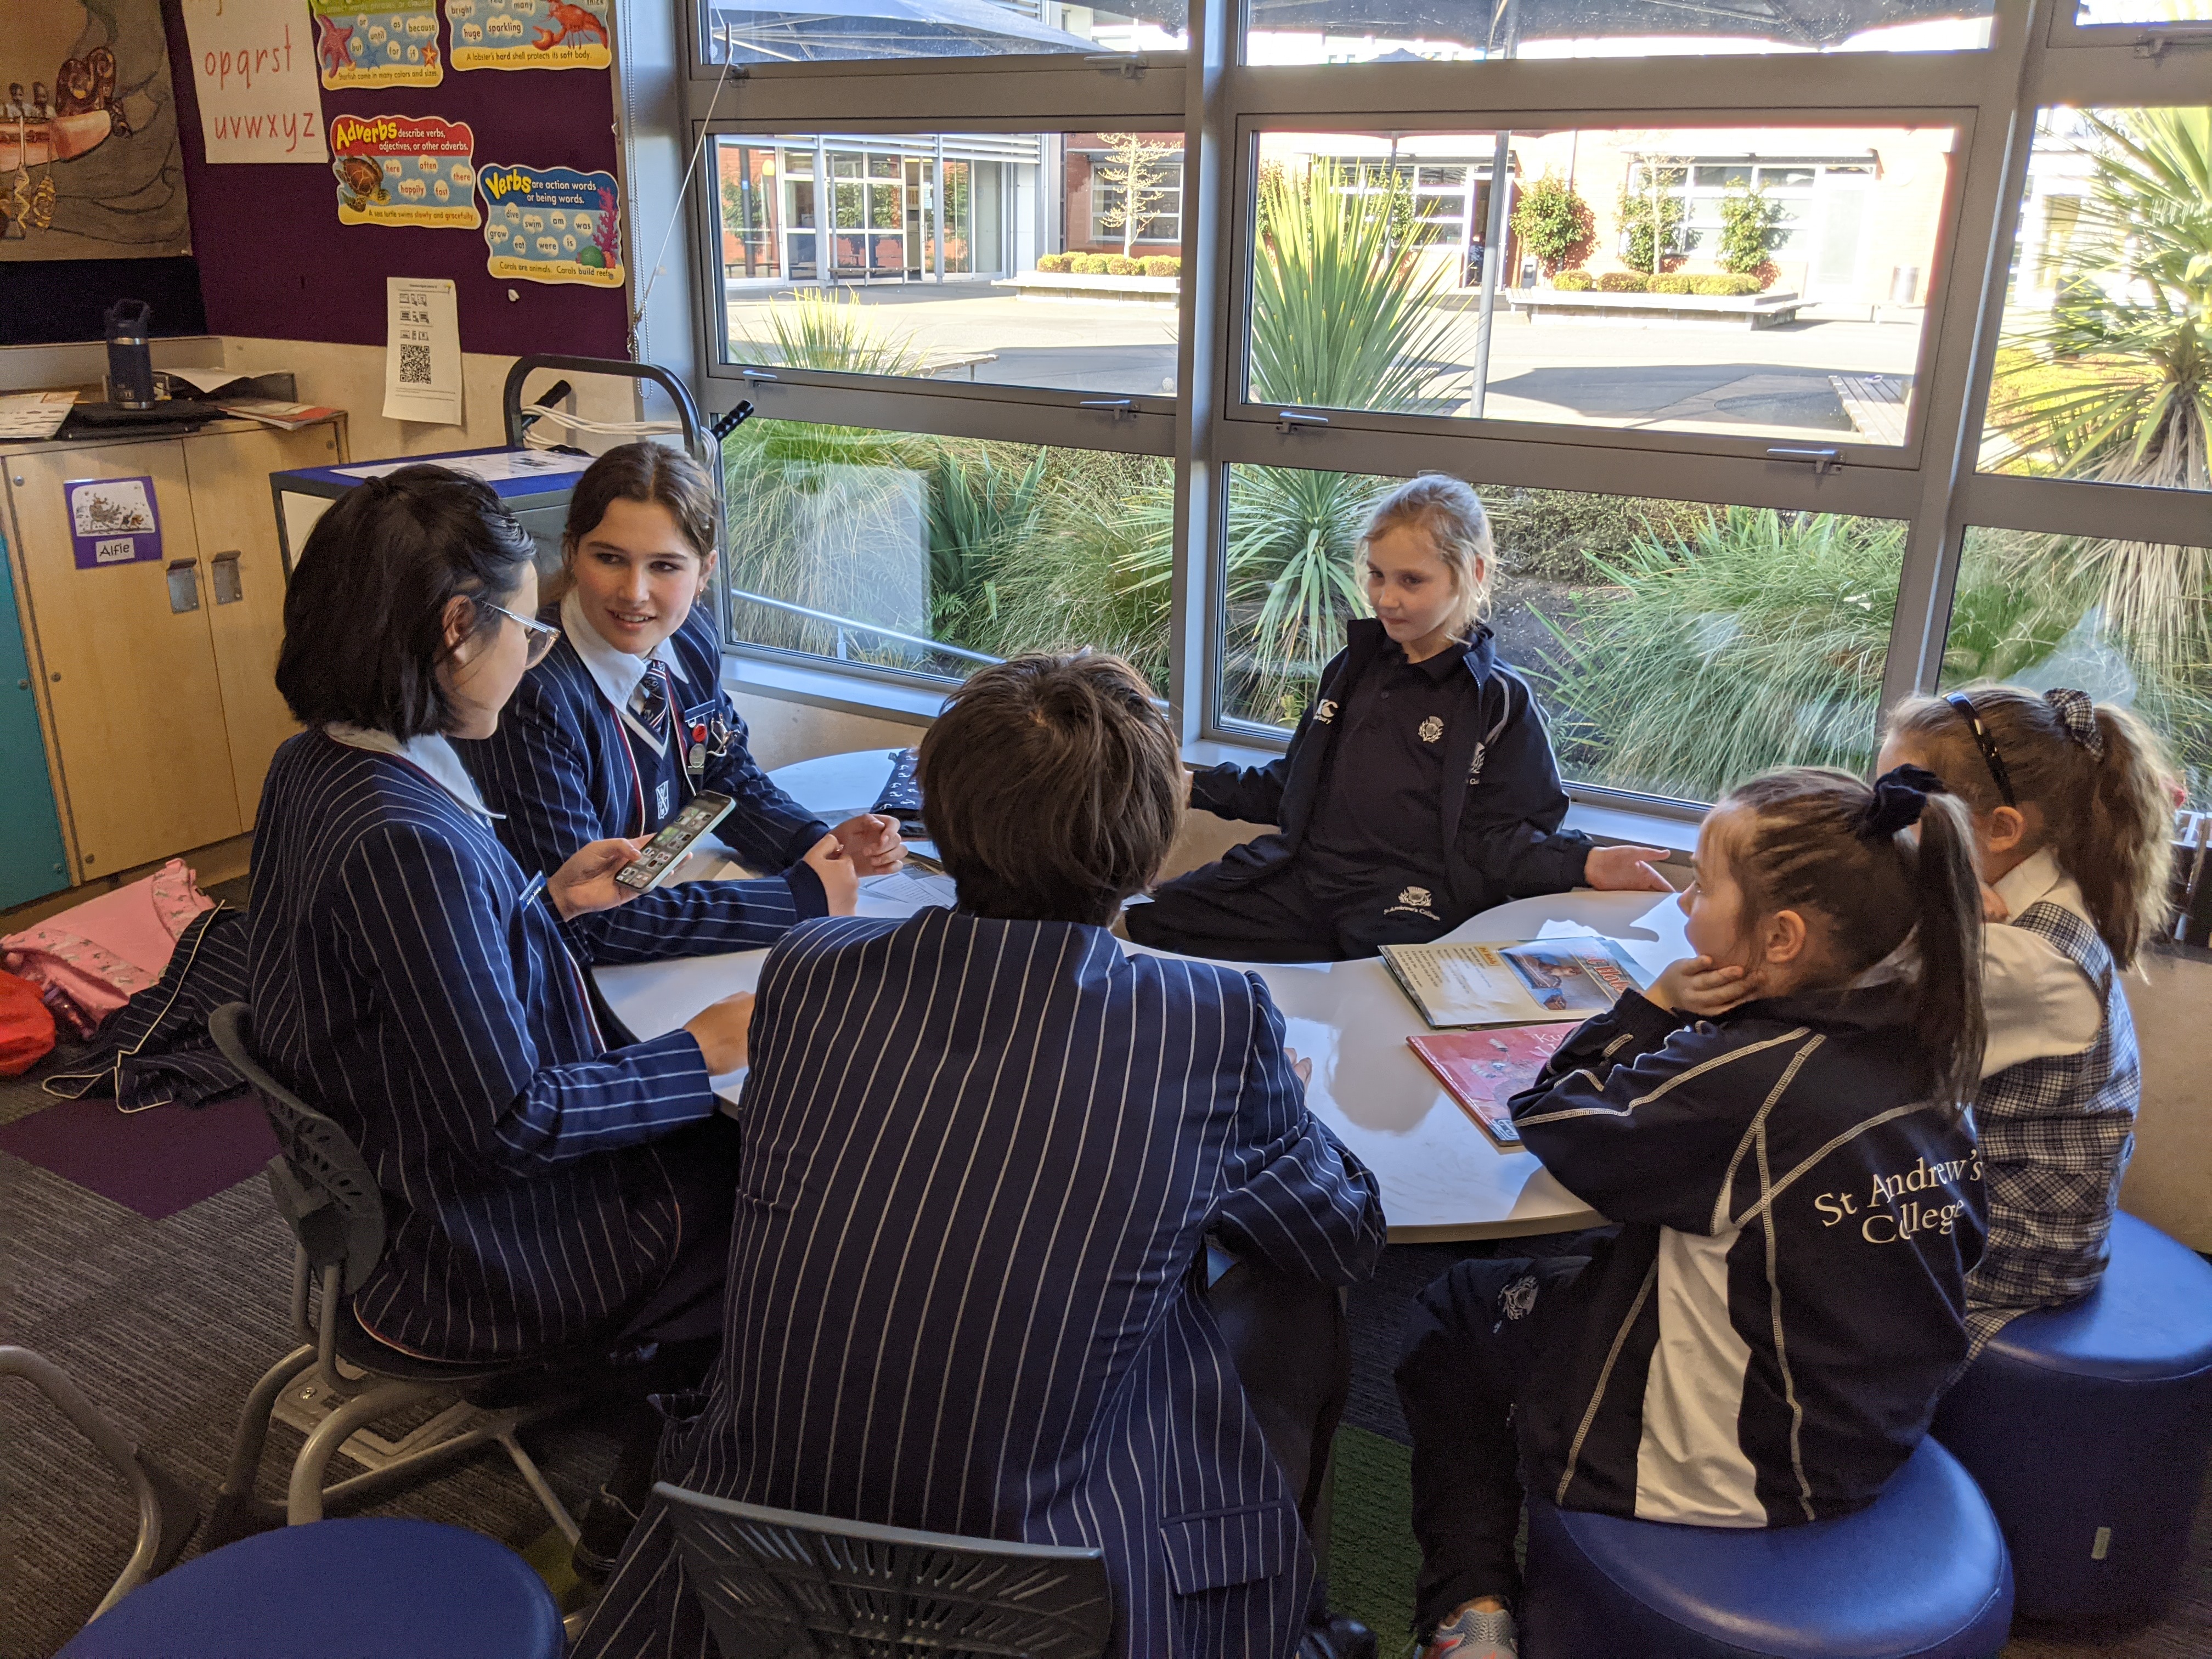
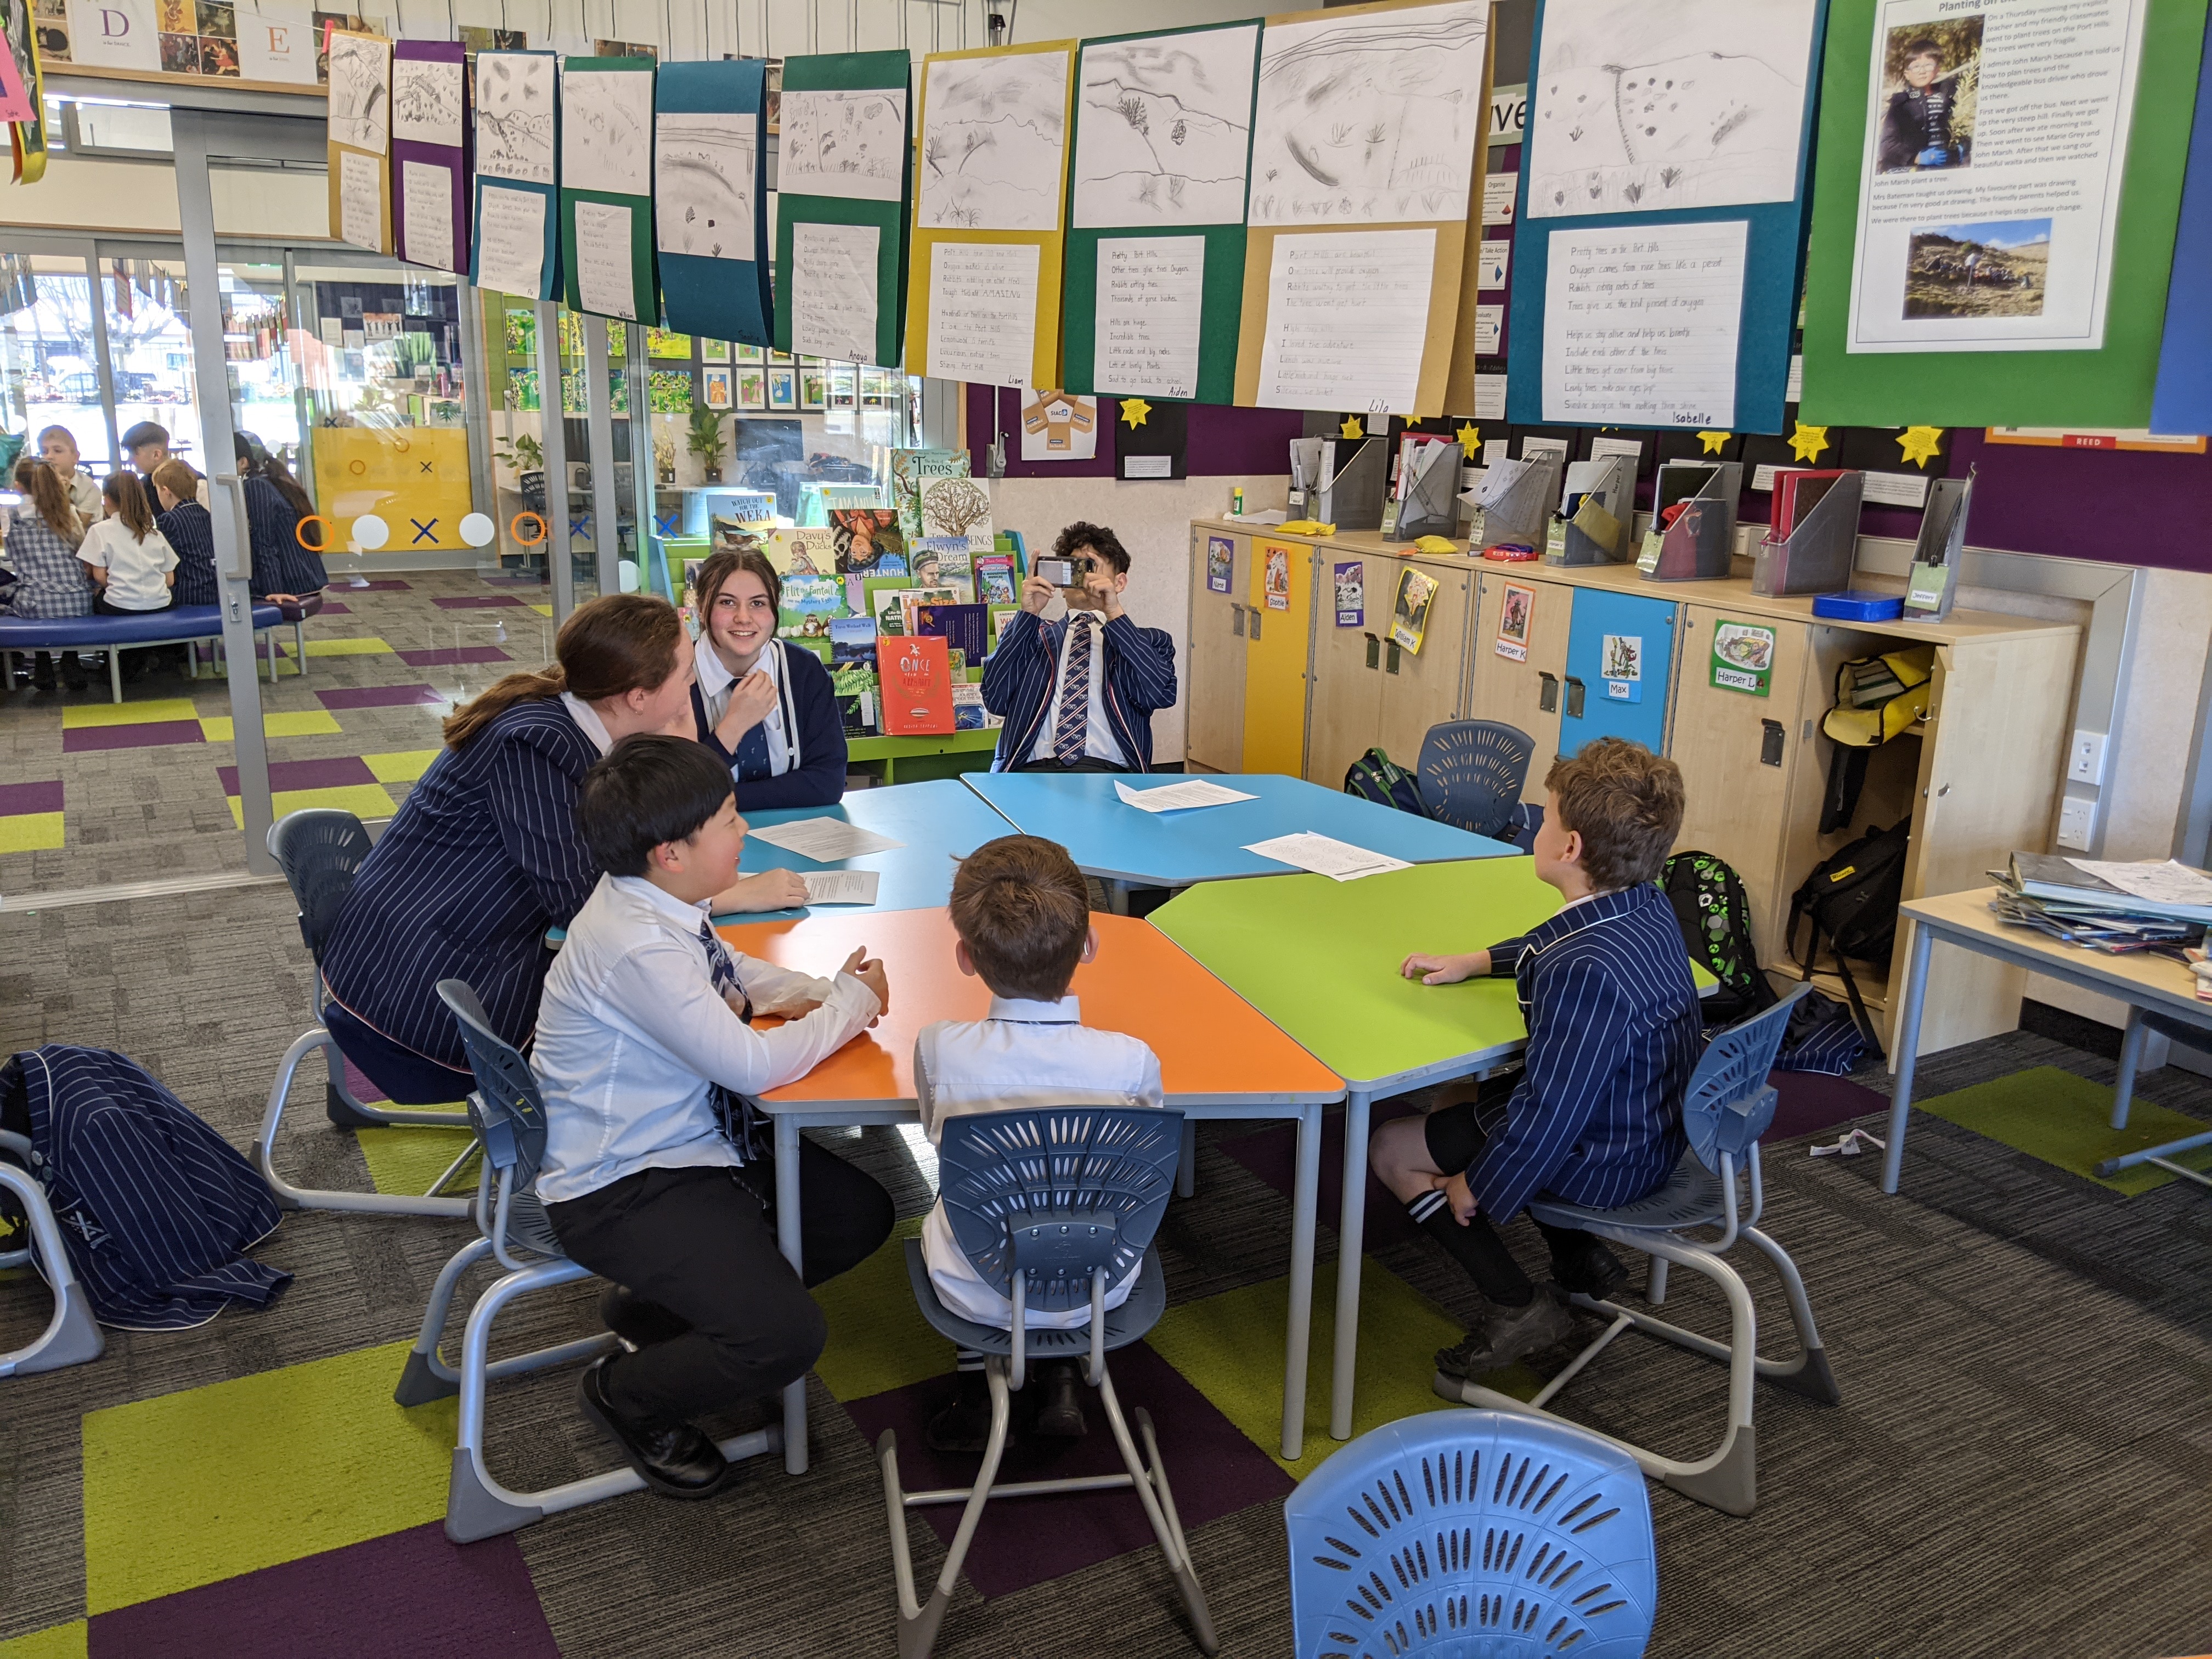
I got them to go to the year 3 class at St Andrew’s College and interview the students about their native birds inquiry. The year 3’s were in the process of discovering everything they could about New Zealand native birds (alive or extinct). They were learning about the their size, their habitat, their sounds and what are their main threats.

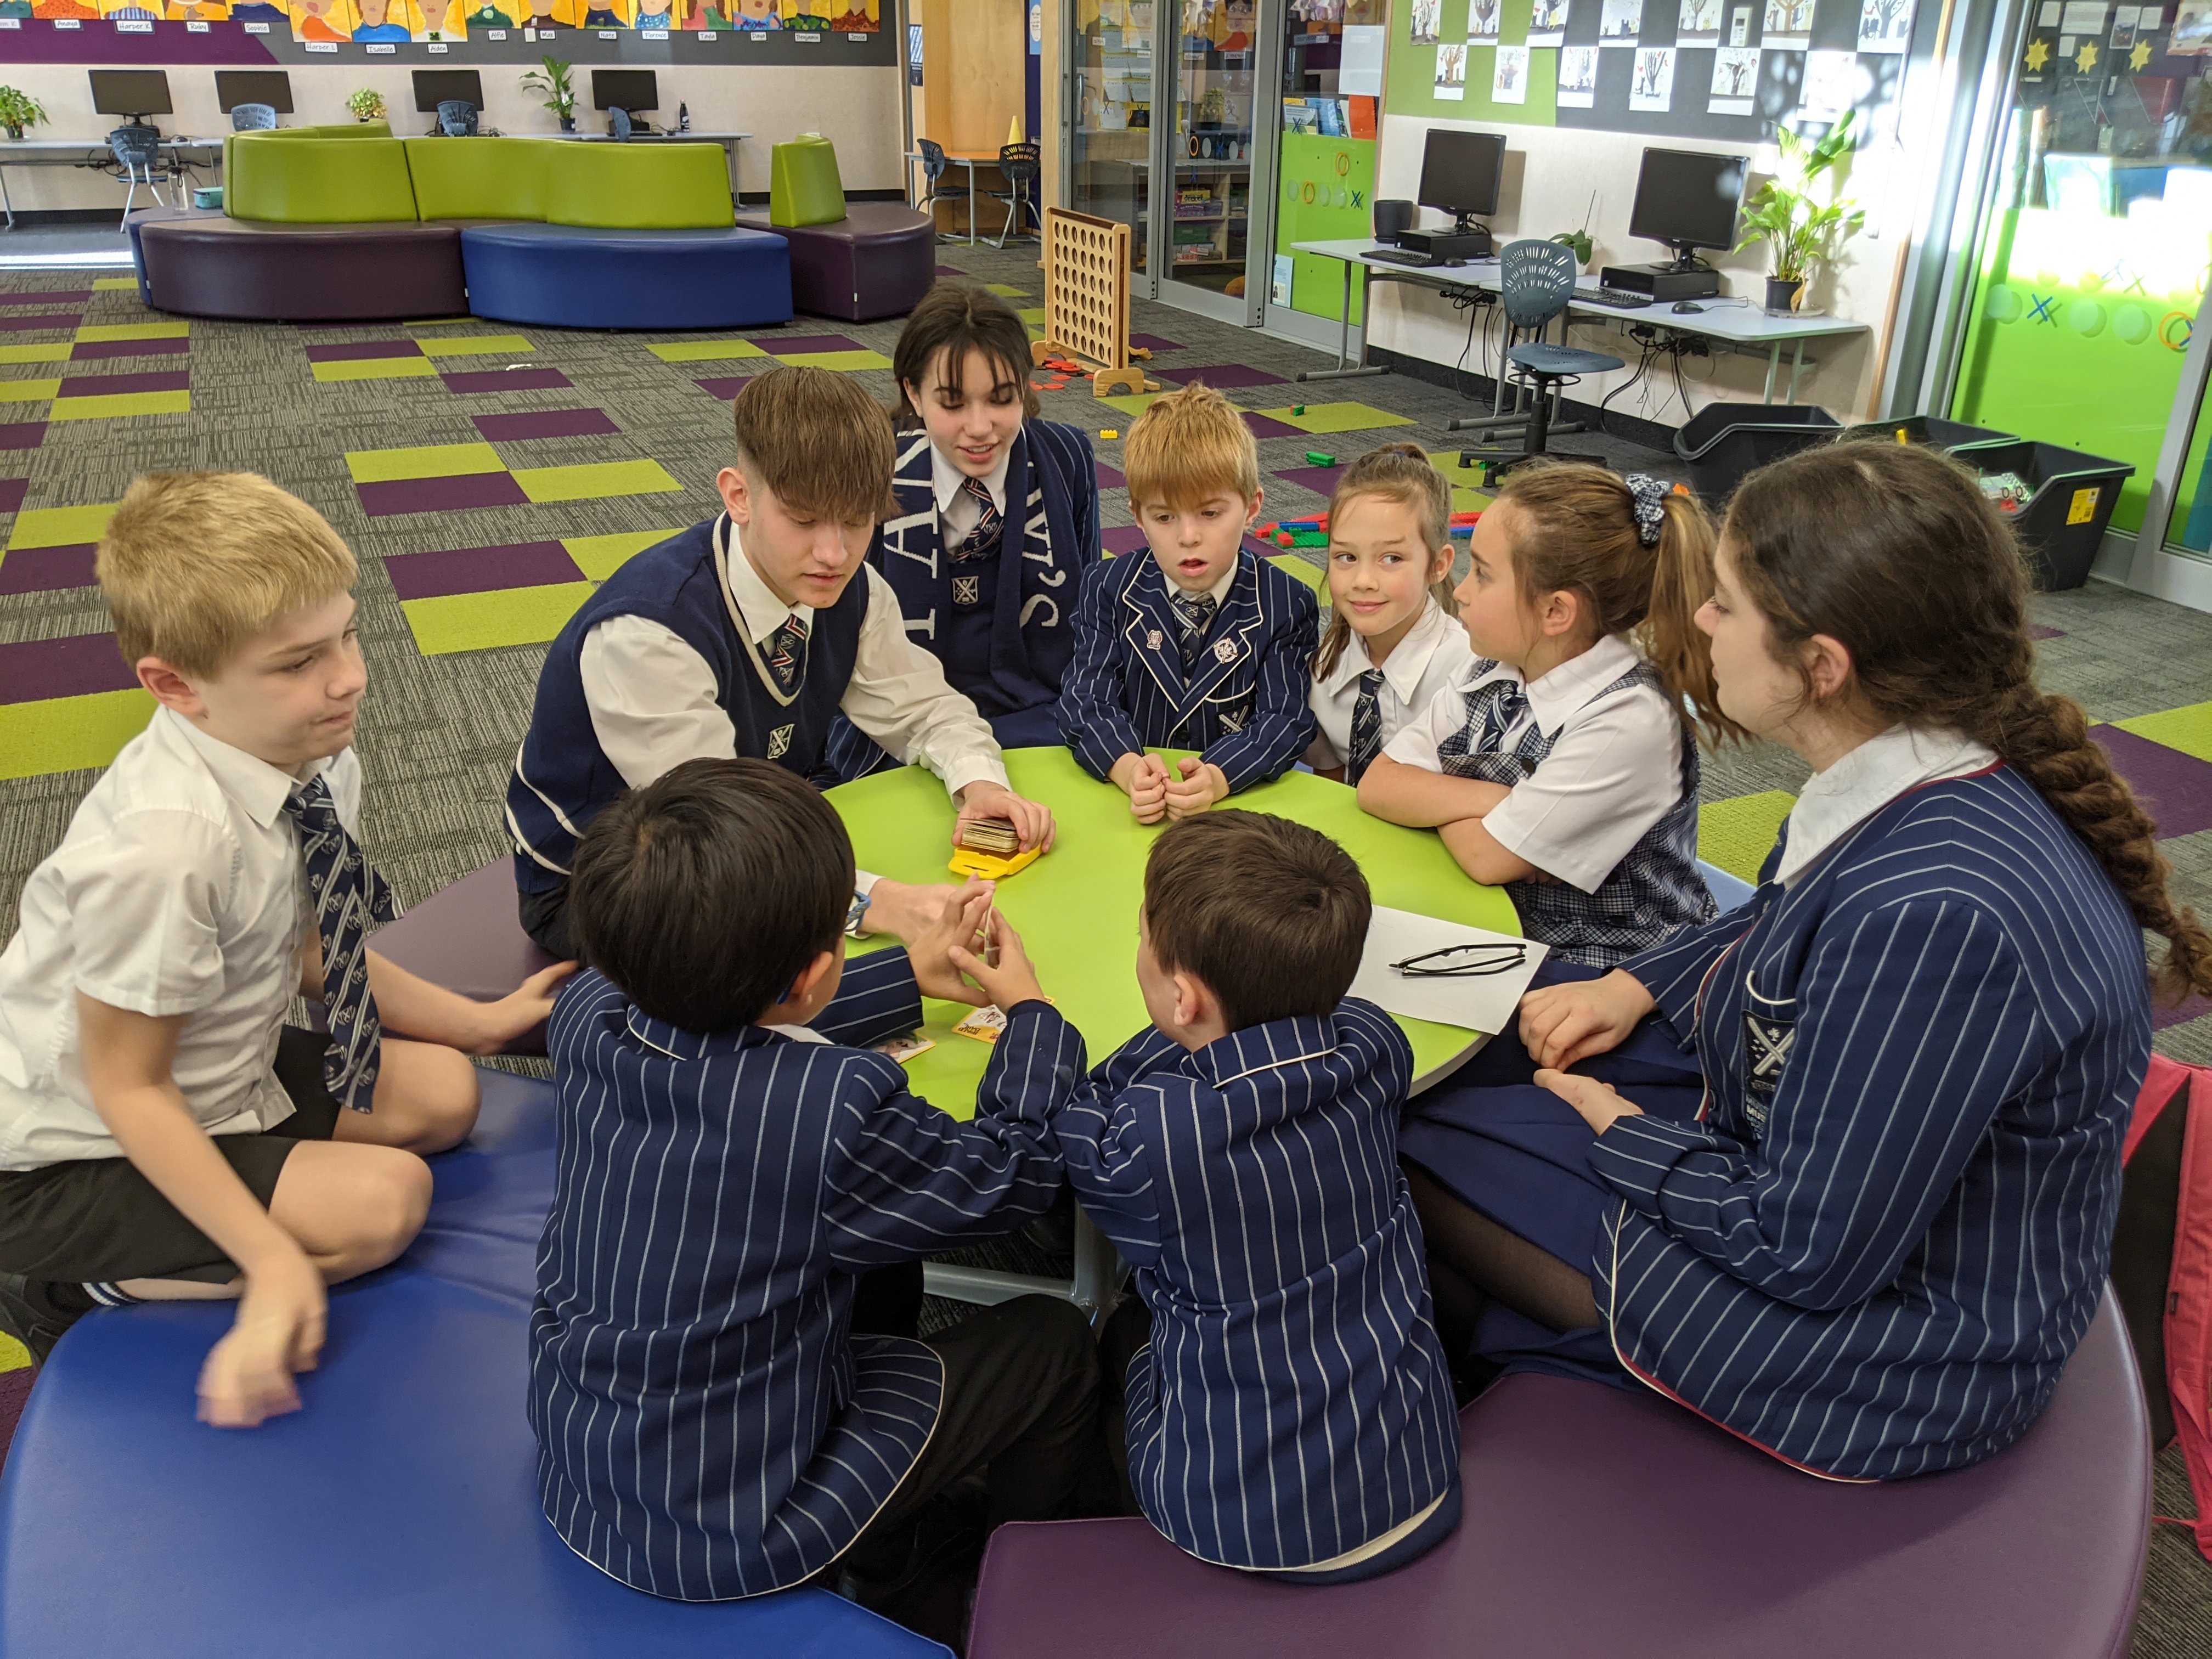
I divided my class of 14 students into four groups and put them with a group of year 3’s for half an hour. They laughed, sang and had a great time together. My students recorded the interviews on their phone, took pictures of the student artwork and generally gathered a lot of raw material with which they could go away and start writing songs about.

Task overview

I designed a simple overview for my students to help them with structuring their time which you can see here.

In each of the year 12 groups I made sure that there was someone in each group who had strengths in the following areas:

  • Lyric writing
  • Chord construction
  • Beat making/production

Throughout year 11 and 12 my students have all developed a solid understanding of:

  • Song structure
  • Using Logic or FL Studio for recording and beat making
  • What a melody should be like in verses and choruses
  • How to develop vocal harmonies
  • Chord construction
  • Developing instrumental hooks and counter melodies

Of course, all the students are stronger in some areas than others, but within the groups all the bases were covered. As my students have already written at least 4-5 songs/compositions they didn’t need to learn about the process. My job was to make sure they were staying focused, not spending too long on little things, and to help resolve conflict through questioning around their overall purpose.

Unfortunately due the COVID lockdown in term 3 I was not able to spend any time with the students analysing kids songs in general to help them understand the challenges writing for a young audience. My original intention was for my students to write songs that could be sung by the year 3’s in class. But with the loss of class time I decided to just let the students go for it and write the songs in any style they feel comfortable with.

All the groups worked well together for the most part but there were certainly times of tension and personality clashes. Which is great! I was hoping that would happen. The students were able to work through their issues and complete the job in spite of how difficult it was for them at times. This is the nature of collaboration! They learned that you may sometimes disagree, but you need to come up with a solution that meets the brief and deliver on time. And they did. I’m sure all teachers will see how many of the Key Competencies are being displayed through this process.

Here are the four songs that my students wrote. You are welcome to download them and share them with your classes.

Technology required to make this happen

St Andrew’s College is a BYOD school but when I have student collaborating I don’t allow them to use their own laptops for the main project file in case one of them is away sick or on a school trip. Therefore I use music department desktop and laptop computers.

Each computer is loaded with Apple’s Logic Pro and all the computers are sync’ed together with shared Dropbox folders. This ensures all their work is automatically backed up to the ‘cloud’ and I am always able to access their projects from my laptop. Halfway through the process we have a class review of each other’s projects and being able to access all their files from my laptop makes this a whole lot easier.

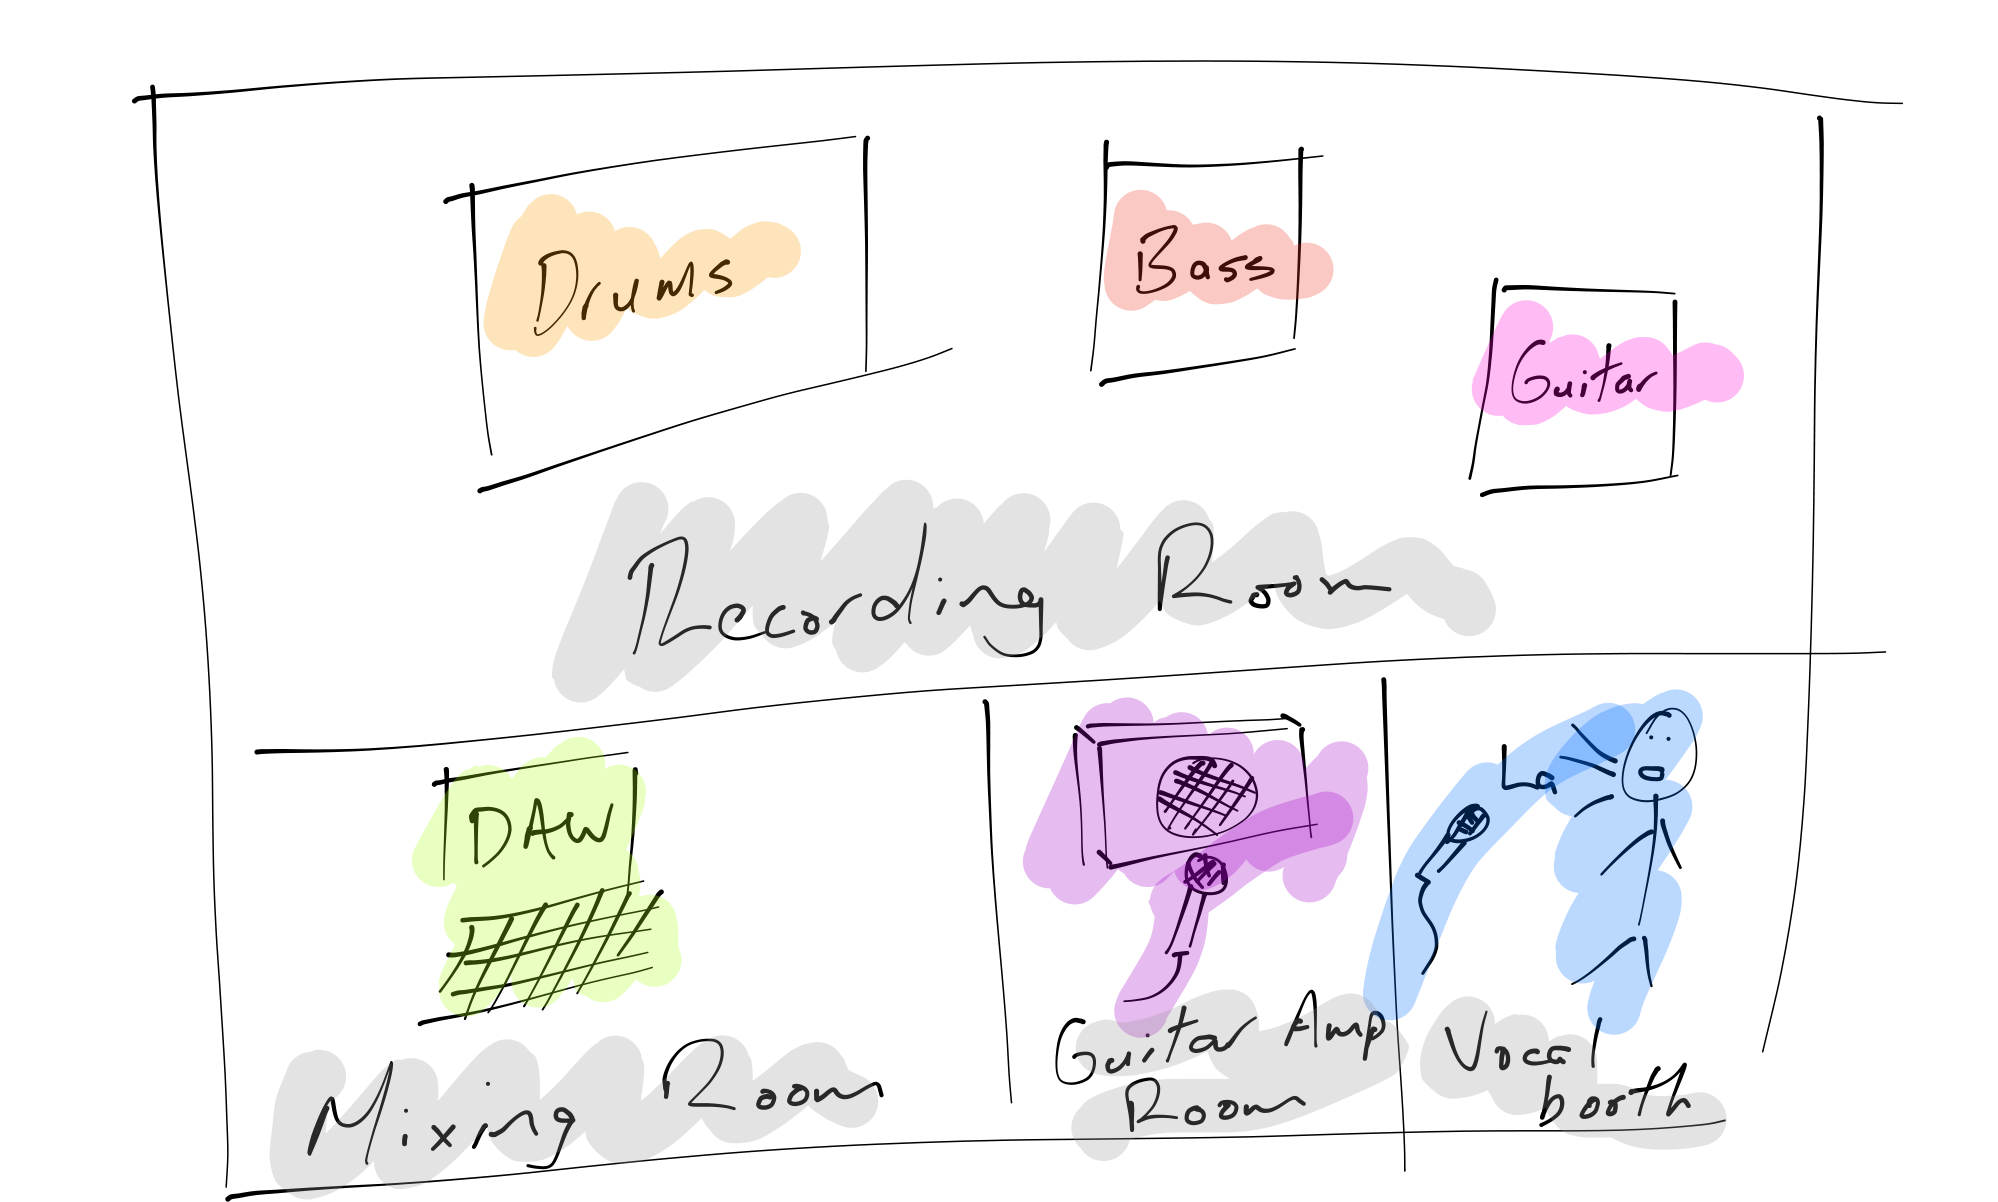
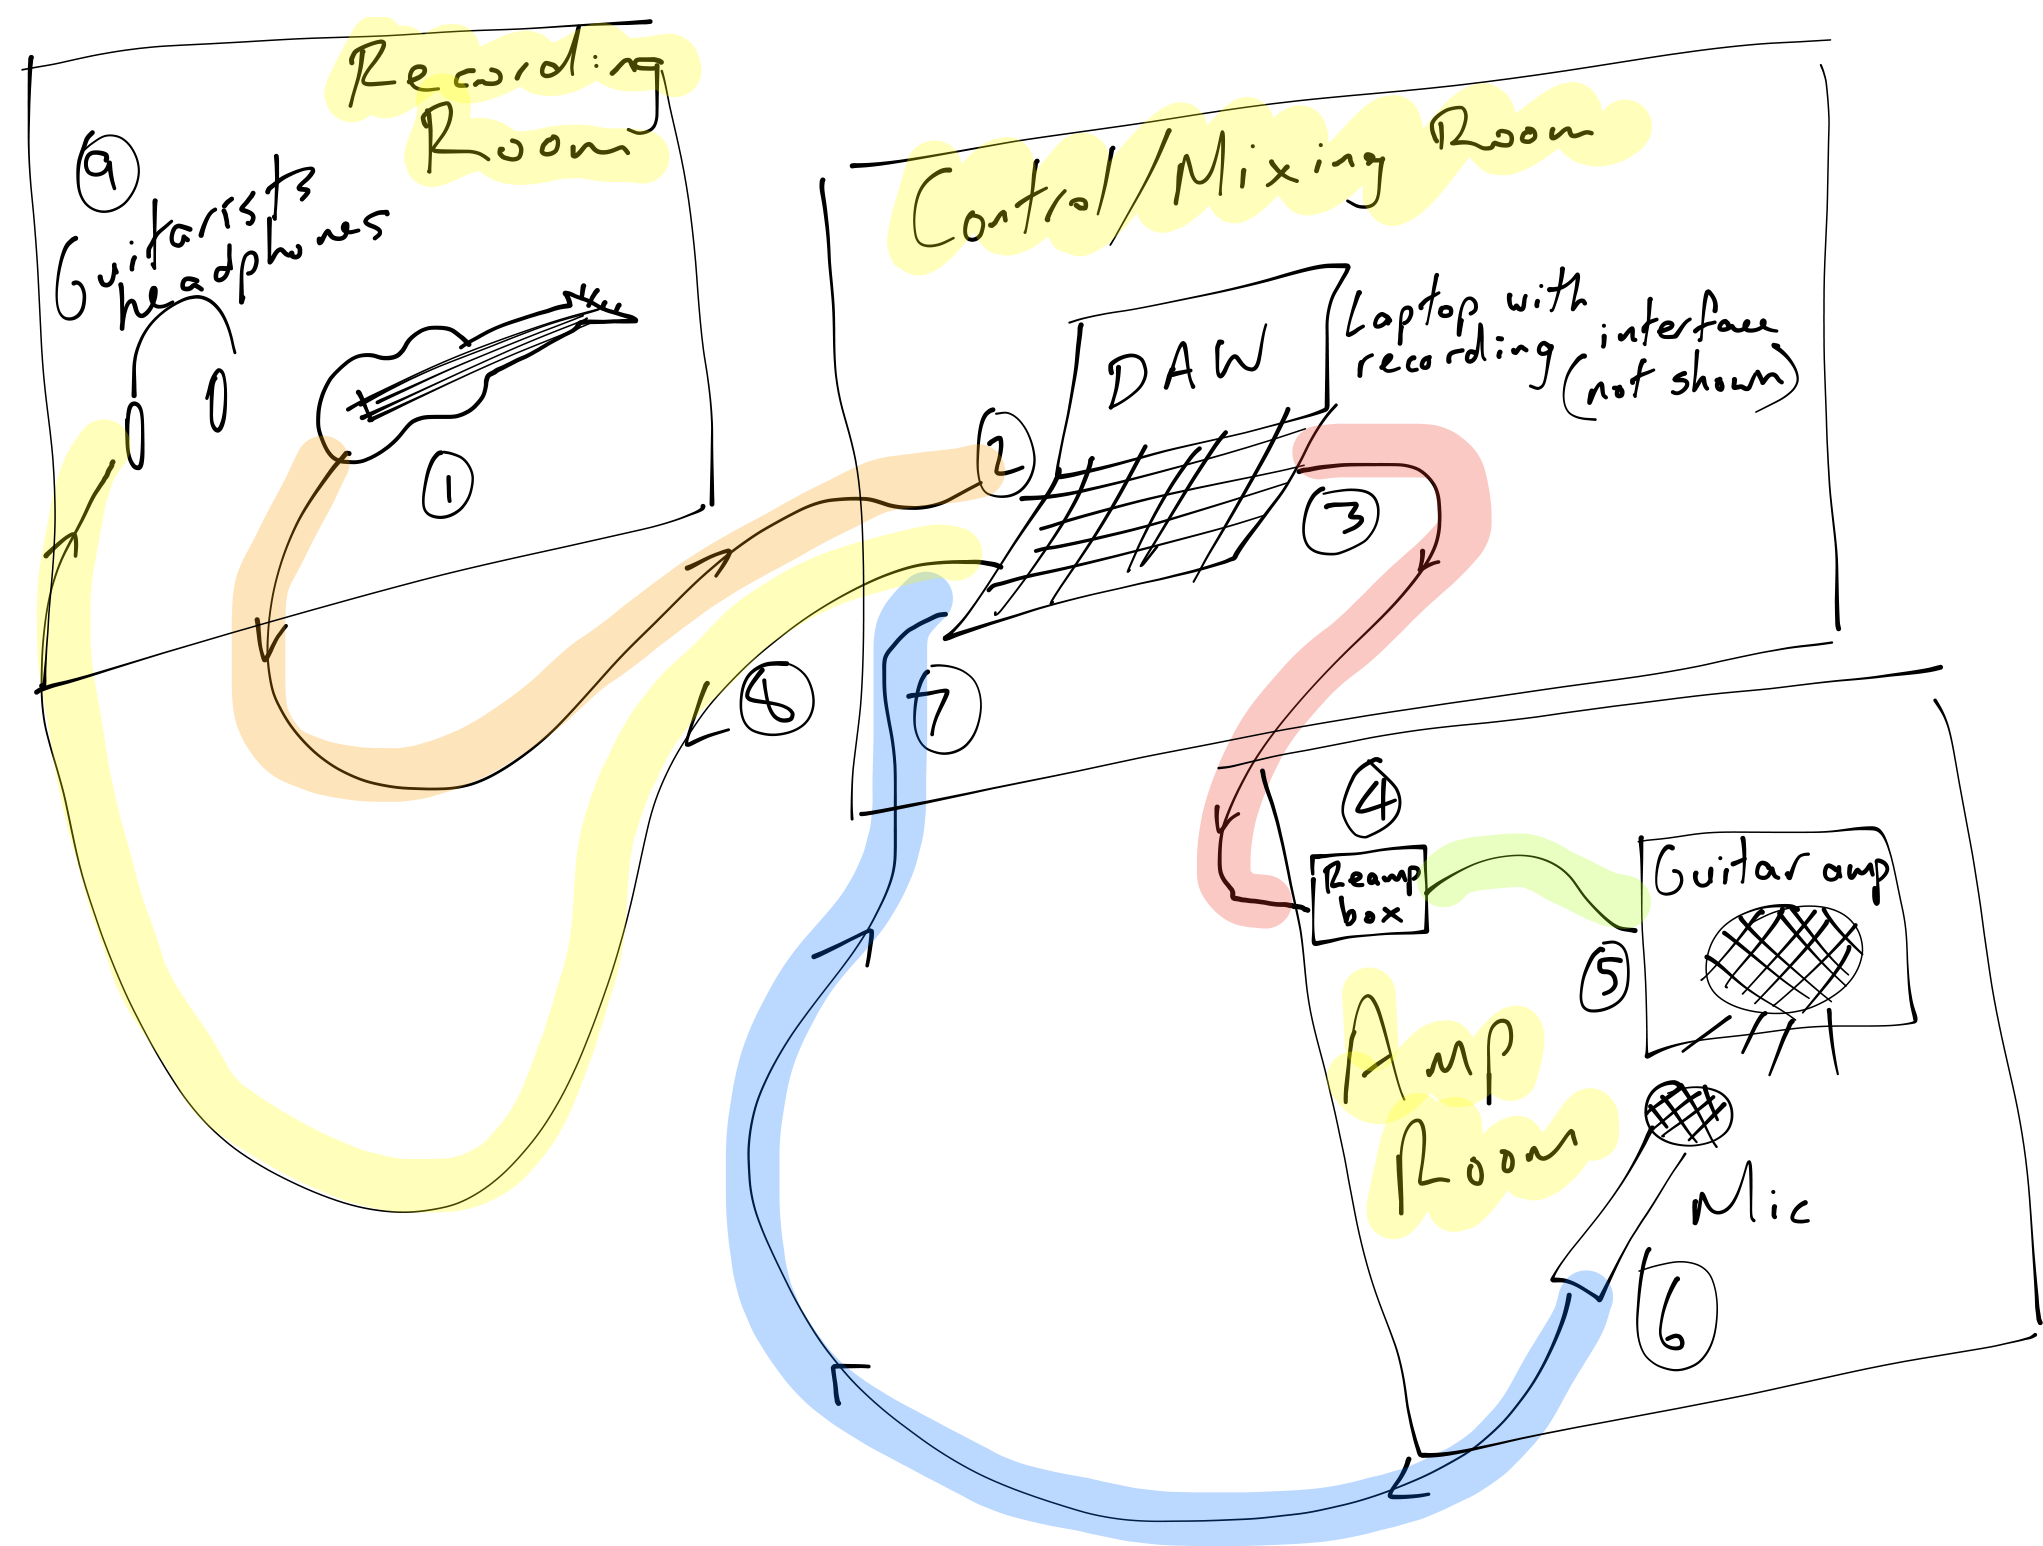
The students were set up in our studio, my office, my classroom and a practise room. Each group with an audio interface (Focusrite Scarlett Solo), a microphone (Shure SM58), headphones/speakers and a small MIDI keyboard (Novation Launchkey).

In each group the student who had strength with ‘beat making’ would have their own laptop to make the beat while the others are lyric writing, recording guitar/keys, etc. The ‘beat maker’ would construct the beat in sections and then import it to the main project computer once they were ready. This ensured people weren’t sitting around doing nothing.

Outcome

Coming out of lockdown this was the best thing possible for my class. Students had just spent several weeks not interacting with real people, and doing mostly theory and research work online. I got the impression from some students that in some other subjects they were in a sense of panic about having to get through material for our upcoming Prelim exams. Students were really feeling the stress.

But by doing this collaborative and creative work students were really happy and calm. Once again music became their ‘safe place’ in the school day as they could relax and enjoy working with others. And ironically, I would assert they ended up with much high levels of learning and productivity than in any of their other classes who were rushing to get ready for exams.

In reflecting upon the process the students were all surprised at what they had achieved. They all knew there were things they would do differently and better next time, but they had a deep sense of satisfaction in producing such high quality tracks in such a short time period. They all recognised the benefits of collaborative composition and as we head into level 3 Songwriting and Composition they have a wonderful skill set and understanding of the compositional process that will serve them well.

The ideal setup for a school recording studio

Last year I was lucky enough to be granted the Head of Independent Schools Scholarship Trust award. This enabled me to travel to San Francisco and NYC to study how Music Technology is successfully being incorporated into high schools.

As a result of this study I have produced a document called The Music Educators Technology Survival Guide. This is a free download and takes you through recommended equipment required to setup up a music technology programme in your high school. It also provides an overview of the requirements for the NZQA Unit Standards, which you may use to assess your students’ music technology skills.

However, it’s one thing to have all the gear for teaching music technology but I’ve found the physical makeup of your studio/recording/mixing spaces, are critical to student success.

Of course, the quality of the acoustics in your recording space(s) is one of the most important factors but unless you’re involved in a new build of your department there may not be a huge amount you can do (whatever you do, don’t put egg cartons on your walls, they will only make things worse!).

But if you are lucky enough to plan a new setup this is what I recommend you aim for when you’re trying to record a rock band.

Recording Room Setup

Band recording in one room

Some important things to note:

  • All the musicians (apart from the singer) are recording in the same room at the same time but the only instrument that is actually mic’ed up in the recording room is the drum kit.
  • The guitar signal is recorded via a DI box, which is then outputted to an amplifier in a separate ‘amp’ room (using a specialized reamp device). The guitar amp is mic’ed up with one or two mics and those signals are then returned to the recording system. The guitar amp signal is then fed back to the musicians via headphones.
    Guitar Signal Flow
  • The bass player is recorded via a DI box with the signal returned to the musicians headphones. The bass track usually sounds great if you have a good quality DI (like a Radial JDI) but if you need to reamp it later and/or overdub this is also an option.
  • The singer is recorded in the mixing (or other) room with their signal coming back to the musicians’ headphones. If the quality of the singer’s track is not good enough they can be overdubbed later.

Why does this setup work so well?

Generally high schools students are not going to be good enough to record to a click track and retain a good feel, and they’re also not great at overdubbing instruments one by one. So this setup allows them to play all together as they would in a normal rehearsal room, hopefully creating a great groove.

But with our multi-room setup (i.e. having an amp room) we are able to record each instrument on to isolated tracks in our DAW so if one musician makes a minor mistake you don’t have to stop the take as you would if you had the amps in the same rooms as the drum microphones. Any minor mistakes can be cut out and re-recorded (or inserted from another take) just by the musician that made the mistake, without forcing the whole band to do another take.

Having all instruments on isolated tracks (without any ‘bleed’ from the other instruments in their tracks) allows us to fix timing and pitch issues with software like Celemony Melodyne.

On a recent session the bass player had huge trouble locking in with the drums. If the band had recorded to a click track it would be easy to ‘quantize’ the bass audio to the grid but as I said before, most high school bands aren’t good enough to be able to record to click well.

But using the new version of Melodyne 4 you are easily able to generate a ‘tempo map’ of the performance (most likely using the drum kit as your timing reference) which you can then quantize the bass to, making the two musicians perfectly in time with each other (even though they didn’t record to a click). I’ll do a full review of this software and walk through this process in a future blog.

If you want hands on, practical help with understanding how to create a recording setup like this I’m running workshops for teachers – Learning Ideas Teacher Training.

What is your physical recording setup in your school?  Comment below and share what works for you.

Thanks, Duncan

A fantastic DAW for Music Technology teachers…

Late last year I did a post stating that for New Zealand Music Technology teachers one of the best Digital Audio Workstation (DAW) to use was Studio One Free from Presonus (along with Garageband and a few other choices).  Pretty much straight after doing that post AVID announced that they were producing a free version of their industry standard software, Pro Tools. Well… it’s taken them six months to finally release it (I was wondering if it was going to be vapourware) but Pro Tools First is now here.  You don’t seem to be able to download it from the website straight away.  You have to subscribe on the website and they will send you an email with the download link. After a very short time of playing around with it I’m 80% certain I can now recommend it to NZ teachers as the best software for teaching music technology with the MUSTEC Unit Standards (27656, 27658, 23730) and SOND Unit Standards (26687, 27703, 28007). I’m not doing to give it a complete endorsement until I get into the school term and have tested it with a bunch of students on a bunch of different computers but for now here is why I think it’s going to be the best option for NZ students doing the above Unit Standards:

  • It’s free!
  • It is very similar to the full version of Pro Tools, which is the worlds most popular DAW for recording studios movie post-production.
  • It works on both Mac and Windows
  • It includes high quality, fully functional 7-band parametric EQ, compression/limiting, gates & expanders, reverb, delay, etc
  • It includes Xpand 2, a high quality software synthesiser/sound library that provides all the necessary instruments to do the MIDI requirements of the MUSTEC standards

PT First Edit Window

So, how are these features specifically better that other options for school teachers? (note, I’m not comparing it to software like Logic, Cubase, Pro Tools HD, etc as these all cost too much money for most schools).

Presonus Studio One Free – this is severely limiting in the plugins it provides.  Therefore you can not use this software for 27703 and 28007.  It has a great software synth for level 1 MUSTEC/MIDI but it’s not a good choice of software for level 2 and above.  Please note, Studio One has recently been updated to version 3 and their new free version, Studio One Prime, has not yet been released.

Garageband – this is Mac only.  If you have Mac’s then it’s probably the best solution for your school as it’s likely your students will be very comfortable using it and it has a low learning curve.  If you’re in a Windows and Mac environment then it’s good to still use but teachers may prefer to keep things simple and use one piece of software across both platforms.

Reaper – this isn’t strictly free (it has a never-ending evaluation period) but it does provide great plugins (including EQ, compression, reverb, etc).  However, it doesn’t ship with very good software synth options for working with MIDI.  You have to install third party options.  While I have provided instructions how to use this with third party synths (like IK Multimedia’s SampleTank Free) in my MUSTEC 1 27656 resource many teachers have found it quite confusing (which is why I amended that resource to include Studio One free Tutorials). So is Pro Tools First the ultimate option for teaching music tech/recording in NZ high schools?  Quite possibly, however like most things in life, there are a few catches:

  • You have to create an AVID account which stores the sessions in the Cloud.  I’m not sure what kind of strain this will place on school wifi networks but I’ll be interested to test it over the coming weeks.
  • You can only have three projects going at once.  However, you can delete old projects which will free up a space.  I think they will allow the option to purchase more project ‘slots’ in the AVID Marketplace but personally I don’t think this will be necessary, students just have to be good about finishing projects before starting new ones.
  • You can’t use any 3rd party plugins with it.  But as mentioned above, the included plugins are excellent so they’re not required for teaching purposes.

I’m sure there may be some other negatives but these are not apparent to me as yet.  No doubt students will find problems for me! I’ve done a little video demonstrating setting it up and recording some basic MIDI and audio with it:

I’d love to hear from other teachers and students about their experiences with Pro Tools First.  Please give it a go and come back here to post comments about your experiences.

Thanks,

Duncan

UPDATE SEPTEMBER 2016 – Hi there, well I’ve now been using Pro Tools First with students for the last year and I have to say… be very careful with it!  It is so buggy, it is constantly crashing and my students have had real problems with it.  It’s such a shame as on paper it really does look like the best DAW for students.  I have had students complete assignments on it but it has been tough going.  Some students with two year old laptops had to give up and switch over to Reaper or Studio One.

Anyway, it’s free to try so if you can download it and get it working then everything I’ve written above still stands.  It will be great for you.

Project Based Learning in music – part 2

This year with my year 13 music students we are deciding to make a point of not focusing on assessment as being the driver of learning in class (as it should never be but is rarely the case in most NZ schools).  Therefore we are deciding to focus on projects our students can complete through the year.  Projects such as making an album, composing for student films, making music videos. You can see details of my holiday planning for this course here.

We are now nearing the end of term one, and what a busy term its been.  But what is hugely satisfying is that the majority of my class are loving the projects they’re working on and making great progress.  It should be noted that not all students in year 13 music have decided to have a project as a major focus.  They’re quite happy completing the tasks and learning as required by NCEA and that’s great. So, what has this PBL thing looked like this year?  Well, a bit like this:


We started the year spending quite a bit of time searching for inspiration and listing the interests and skill sets of the students.  I’m very big on collaboration and I want the students to help each other out as much as possible.  To keep our ideas and skills at the forefront of what we do we created an Inspiration Wall where students pin up interesting musical related images and text as well as list their outline of their project.

Students have also setup WordPress blogs where they keep a diary of what they’ve found interesting in class and on field trips. Every time we do something in class, or they do some work, they’re expected to document their progress on their blogs. You can see some of them here:

https://jamesmurraymusic.wordpress.com

https://blipblipbang.wordpress.com

https://gusellerm.wordpress.com

https://maxmusic42.wordpress.com

Reading through the blogs you can see we’ve done a few things to focus the students on the craft they need to develop to realise the art they want to produce.  These have been:

  • Guest presenter – Luke Di Somma (local conductor, producer, arranger, composer, MD, etc).  The students were very inspired by chatting to Luke and he dealt with issues such as: where he finds creativity, how he manages his ‘business’, what motivates him, what is required to ‘make it’ in the music industry, etc
  • Visit to local studios and tertiary providers – as recording and technology is a big part of the students’ projects we visited MAINZ and had a great presentation from Ivan Shevchuk.
  • Watching music production tutorials from AVID doing our own mix of the tracks shown in the video.

For the rest of the term we’ve been largely focusing on getting the first part of their projects completed.  This has involved teaching them about how to use our recording equipment and how to mix.  There has been a lot of one-on-one instruction about crafting their compositions and arrangements.  At this stage, we’re just trying to record demo’s of everything as it’s unrealistic of them to produce good quality recordings in term 1 when they have so much learning to do around music production.  It will mean a lot of recording and mixing in term 3 and 4 so we’ll see how we go…

To assist with their learning about recording and mixing we’re going to start a course in mixing through Weathervane music.  Their Instructors Toolkit looks like it could be a great syllabus to work into our music course to advance their music production skills.  I’ll do a separate blog on this once I start using it with my students.

Where to from here…

Well, we’ll need to refocus on what it means to be creative and to make great Art.  We’ve spent quite a while focusing on their craft and finishing the first aspect of their projects, so we need to redress the balance and get focusing on what they are trying to achieve with their project by the end of the year. We’ll get more industry professionals in to talk to us and will visit local producers who can demonstrate their workflow and assist with the discussion around where to find inspiration. Students need to do a stocktake of all they’ve accomplished this term and now that they know what they’re in for need to come up with specific goals that must be achieved in term 2.

We’ll also be joining with the year 13 media class to provide the music for their original short films they’re creating.  This is very exciting and as we’re well setup at St. Andrew’s College with movie composition tools and equipment I’m expecting to see some very professional looking/sounding films in the StAC Film Festival this year.

How to mix… a guide for high school teachers – part two

In my last blog post I demonstrated a good starting point for teaching students how to mix.

After six weeks or so of having my students mixing using only faders, panning and EQ (on a few projects) I then start to discuss the overall picture of the mix process.  Advanced students would be required to purchase the excellent Mike Senior book on mixing on Kindle in addition to reading other articles online and visiting blog posts like soundscoop (and a multitude of others).

Many recording equipment manufacturers like Universal Audio, AVID, Presonus and many others also offer excellent mixing tutorials and students are encouraged to complete as many of these as possible.  However, while we all have some motivated and diligent students, we’re always going to have several that need a little more ‘spoon-feeding’ (which of course we always try to ‘wean’ them off as good parents/teachers should!).  It would be great if all students went to these websites and started teaching themselves (which undoubtedly some students will) but for others I’ve done a few guides that may help.

NZ Music Technology teachers will be familiar with my resources from http://www.learningideas.co.nz and these are excellent guides specifically tailored to the NZQA assessment system.  A resource I wrote several years ago (which was hugely influenced by the excellent book The Mixing Engineers Handbook by Bobby Owsinski from Mix Books) which I gave away free to NZ teachers can be downloaded here. It basically goes through the stages of mixing and can be summed up like this (but keep in mind there is no one way to mix as every mix and mixing engineer is different – but this is good for newbies):

  1. Balance the faders
  2. Pan the tracks to create a stereo image (although some engineers, particularly if mixing for a live PA system will choose to mix in mono for various reasons)
  3. Use EQ to give each instrument it’s own space in the overall frequency range of the track.  You can think of it like this:
    Screen Shot 2015-01-10 at 9.32.40 am
    (I got this image off the http://www.harmonycentral.com website many years ago and have not been able to find the page for it again so sorry I’m unable to give proper credit to the person that created it).
  4. Use compression on some instruments to reduce the dynamic range to create a more stable volume balance between the instruments (but in many instances it’s more appropriate to use compression before EQ, or before and after, or use multiple compressors… it gets quite complicated really!)
  5. Add ambience with reverb and/or delay.  Note, it’s best to try and get this naturally by recording in a very nice room with good acoustics.  But if this isn’t possible then record the tracks as ‘dry’ as possible and add ambience in your DAW.
  6. Add interest.  All of the above just serves the purpose of making sure you can achieve a stable balance and hear everything.  But it may not make the mix very interesting.  So here you do whatever you need to make the mix dynamic, exciting, original – this is where you attempt to create a piece of great art!  I’ll try to do a blog post dedicated to this point in future weeks.

I’ve done a video for my students and NZ teachers who are teaching the level 2 27703  unit standard, showing how to do a basic mix in a live setting.  Here I’m using a Presonus Studio Live mixing desk and have the audio tracks streaming from my laptop to the mixing desk (rather than having a live band in the room).  I find this mixing desk a great tool for teaching live mixing to my students but all the concepts I discuss in the video are equally applicable to mixing in a studio/DAW environment.

This video has worked well for my students who may not have followed my in-class demos and may be too nervous to ask questions in front of others as they’re able to replay parts they don’t quite understand.  It serves a good way of filling in the gaps for them.

Please note, the tracks from this video were downloaded from the excellent Sound on Sound magazine website.

In another blog post I’ll go into detail about my assessment processes for mixing with my senior students.  Students can’t just do a mix – they have to be able to articulate all their mix decisions and why they made them.

Thanks,

Duncan

10 great resources for teaching recording and mixing to high school students

In New Zealand we now have the wonderful opportunity to teach recording and mixing skills to high school students.  We have Unit Standards that allow us to assess and provide credits towards a course of work in the area of Performing Arts Technology and Music Technology.
However, these Unit Standards only tell us the ‘outcomes’, not the pathways teachers should follow to teach the students to the info and develop the skills.
For NZ teachers I’ve produced a series of resources (documents, tutorial videos, eBooks, assessment schedules, etc) that are written specifically for the NZ system (although the resources are generic enough to be of assistance to anyone wanting to learn about recording and mixing).  These can all be found at www.learningideas.co.nz.
IMG_0200
However, there are many other fantastic resources available that can help teach students about recording and mixing.
  1. Alan Parsons Art and Science of Sound.  This is a fantastic DVD series and covers all the basics of recording instruments and provides great background theory on the developing of recording technology.  The chapters on mixing are very weak though but the videos on recording are gold.  A new accompanying book has also just been released and is available at Amazon.
  2. Mixing Secrets For the Small Studio by Mike Senior – while this might be a hard read for students I’ve not come across anything that explains the concepts of mixing as well as this.  It’s all too easy to use presets on plugins thinking that they will provide you with a good mix (FYI, presets are never the answer!).  This book goes way beyond that showing you how to approach the mix for each song along with the specifics of the techniques for using EQ, Compression, etc.  I’ve bought this book twice as well as on Kindle I love it so much!
  3. Shakingthrough.com – This is an amazing website for a recording studio (Weathervane Records) that records artists but also documents the process from a technical/recording viewpoint as well as a creative/compositional viewpoint.  All tracks of songs featured in the videos are available for download so you can practise your mixing chops.
    They have just released a new educational course in mixing.  I’ll be using this with my students in 2015 so I’ll write blogs about how well it works.
  4. How To Listen app from Harmon – a great tool for teaching students to associate frequency boosts and cuts on EQ with Hz numbers.  This app helps to train their ears to listen critically to frequency ranges and to learn to associate descriptions with those ranges.  Also worthy of a mention is the “hearEQ” app for iOS available on the app store.
  5. hearEQ for iOS from the app store – another brilliant ear training tool – especially it’s ‘learn’ feature which allows you to boost and cut various frequencies of any song in your iTunes library.  Also worthy of a mention is “Quiztones” also available from the App store.
  6. Recording Secrets for the Small Studio by Mike Senior – probably a better book for advanced students who already understand the basics of recording techniques.  This book is excellent at giving tips for recording in less than ideal environments (which most schools are stuck with as very few schools can afford purpose built studios with excellent acoustics).  What is also really great about this book though is the advice that Mike gives with regards to working with performers and how to get the best out of them.  Overall, full of wise advice from one of the best people in the business.
  7. Soundonsound.com – this website (and associated magazine) is the best recording/mixing magazine out there.  It’s the best way of staying up to date with the latest releases in music technology equipment.  Articles are well written and full of practical advice.
  8. Pensados Place – Definitely for more advanced students and teachers… this fascinating production from Dave Pensado, one of the top mixing engineers in the music industry, regularly interviews the top mixing engineers, performers and producers.  The insights into the creative process from people who are at the top of their game and the best in the LA, NYC and Nashville music scenes is really fascinating.  Also great is the “Into the Lair” segment where Dave provides really clever (and often advanced) mixing techniques.
  9. Groove3.com – this website provides excellent video tutorials for all the major DAW’s.  You can pretty much learn everything you need to know for any DAW (like Pro Tools, Studio One, Logic, etc) by watching these 2-3 hour tutorials.  Add in another 3-4 hours of working on what is shown in the videos and inside a day you can get up and running with any DAW.
  10. Live Audio Basics DVD from Down2Earth – this can be pretty painful to watch (I wonder if Americans find it as painful to watch as my students and I do? – could be a cultural thing?) but the content and clarity with which live PA systems are explained is the best I’ve seen.  Yes, the focus is on live PA (and this is supposed to be a blog about recording and mixing resources) but their explanation on signal flow, maintaining Unity Gain, Aux/buss sends,etc are brilliant and all vitally important to recording systems as well.
IMG_0108
I have other resources I use as well, but these are my top ten (of course aside from the resources I’ve written available at http://www.learningideas.co.nz).  Go ahead and list your favourites in the comments section.  I know there are a lot of great websites out there so feel free to list them.
Happy new year!  May your 2015 be full of creative goodness!