If you trained as a classical or jazz musician, chances are nobody ever taught you what a “drop” is. Or a “build”. Or why a four-on-the-floor kick pattern is the heartbeat of almost every dance track your students are listening to right now.
I had to learn all of this from scratch. And what I discovered is that EDM has a clear, teachable structure that is just as logical as sonata form or 12-bar blues. It’s just that most of us never learned it. So here’s a quick primer on how EDM tracks are put together, what the terminology means, and what tools you and your students can use to start creating it.
The building blocks of an EDM track
Most EDM tracks are built around a cycle of tension and release. Where a classical piece might use harmonic tension to drive forward motion, EDM does it through texture, rhythm and energy. There are four key structural elements that almost every track shares.
The intro sets the mood. It’s usually stripped back, with just a few elements, perhaps a simple kick drum pattern or a filtered synth pad. DJs need this section to mix tracks together, which is why extended mixes often have a longer, more percussive intro than the radio edit.
The build-up is where the tension starts to climb. You’ll hear elements being added, a rising pitch effect, snare rolls getting faster, maybe a vocal sample being chopped and filtered. The whole point is to create anticipation. Students pick up on this instinctively because it’s the moment in a track where they know something big is coming.
Then comes the drop. This is the payoff, the moment all that tension is released. The full beat kicks in, the bass hits hard, and the main melodic or rhythmic hook arrives. In genres like dubstep the drop can be aggressive and heavy, with distorted “wobble” bass sounds. In house music it might be more subtle, with a driving groove and a catchy synth melody. Either way, the drop is the centrepiece of the track.
Finally, the breakdown strips everything back again. The drums often drop out entirely, leaving atmospheric pads or a vocal. It’s a moment of contrast, giving the listener space to breathe before the next build-up and drop. This contrast between loud and quiet, busy and sparse, is what gives EDM its emotional power.
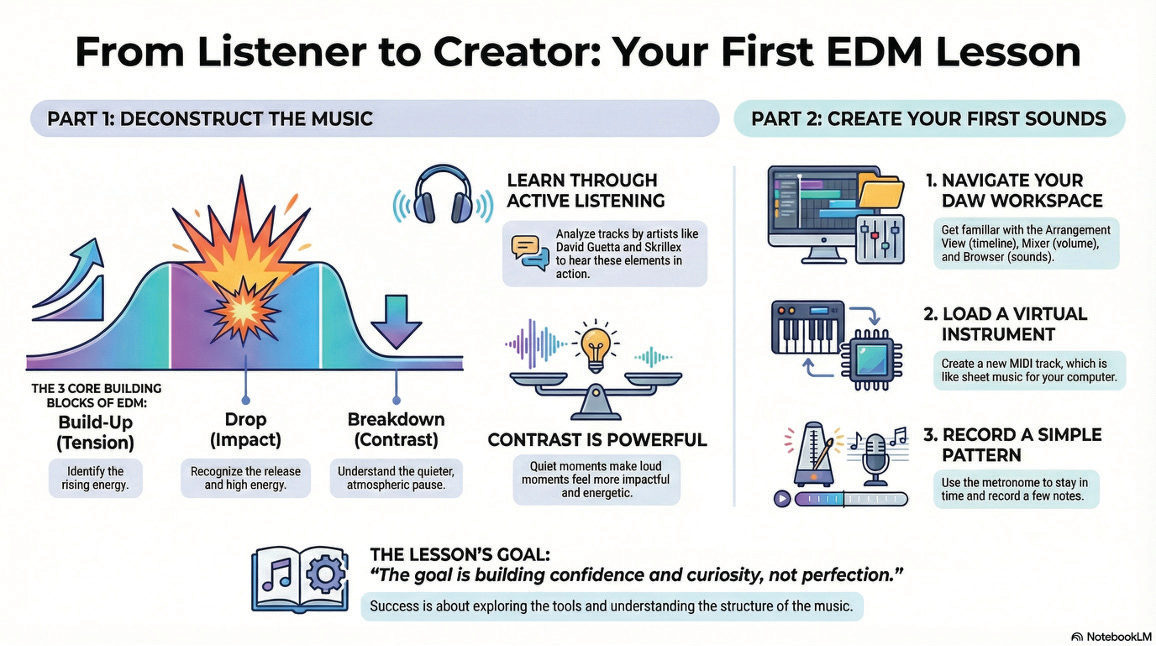
What’s great about this structure from a teaching perspective is that students can hear it immediately. Play them the first two minutes of almost any EDM track and ask them to identify the intro, the build, and the drop. They’ll get it within one or two listens. Try doing that with sonata-allegro form.
The four-on-the-floor
If there’s one concept that underpins almost all EDM, it’s the four-on-the-floor kick drum pattern. It’s exactly what it sounds like: a kick drum hitting on every beat of a 4/4 bar. Beats 1, 2, 3 and 4. Every bar. This constant pulse is what makes the music feel relentless and danceable.
On top of that, you add a snare or clap on beats 2 and 4 (the backbeat), and hi-hats playing 8th or 16th notes to add energy and movement. That’s essentially the foundation of every house, trance and techno track ever made. You can demonstrate this to a class in about 30 seconds by playing the opening of Daft Punk’s “Around the World” or Calvin Harris’s “Feel So Close” and asking students to tap along.
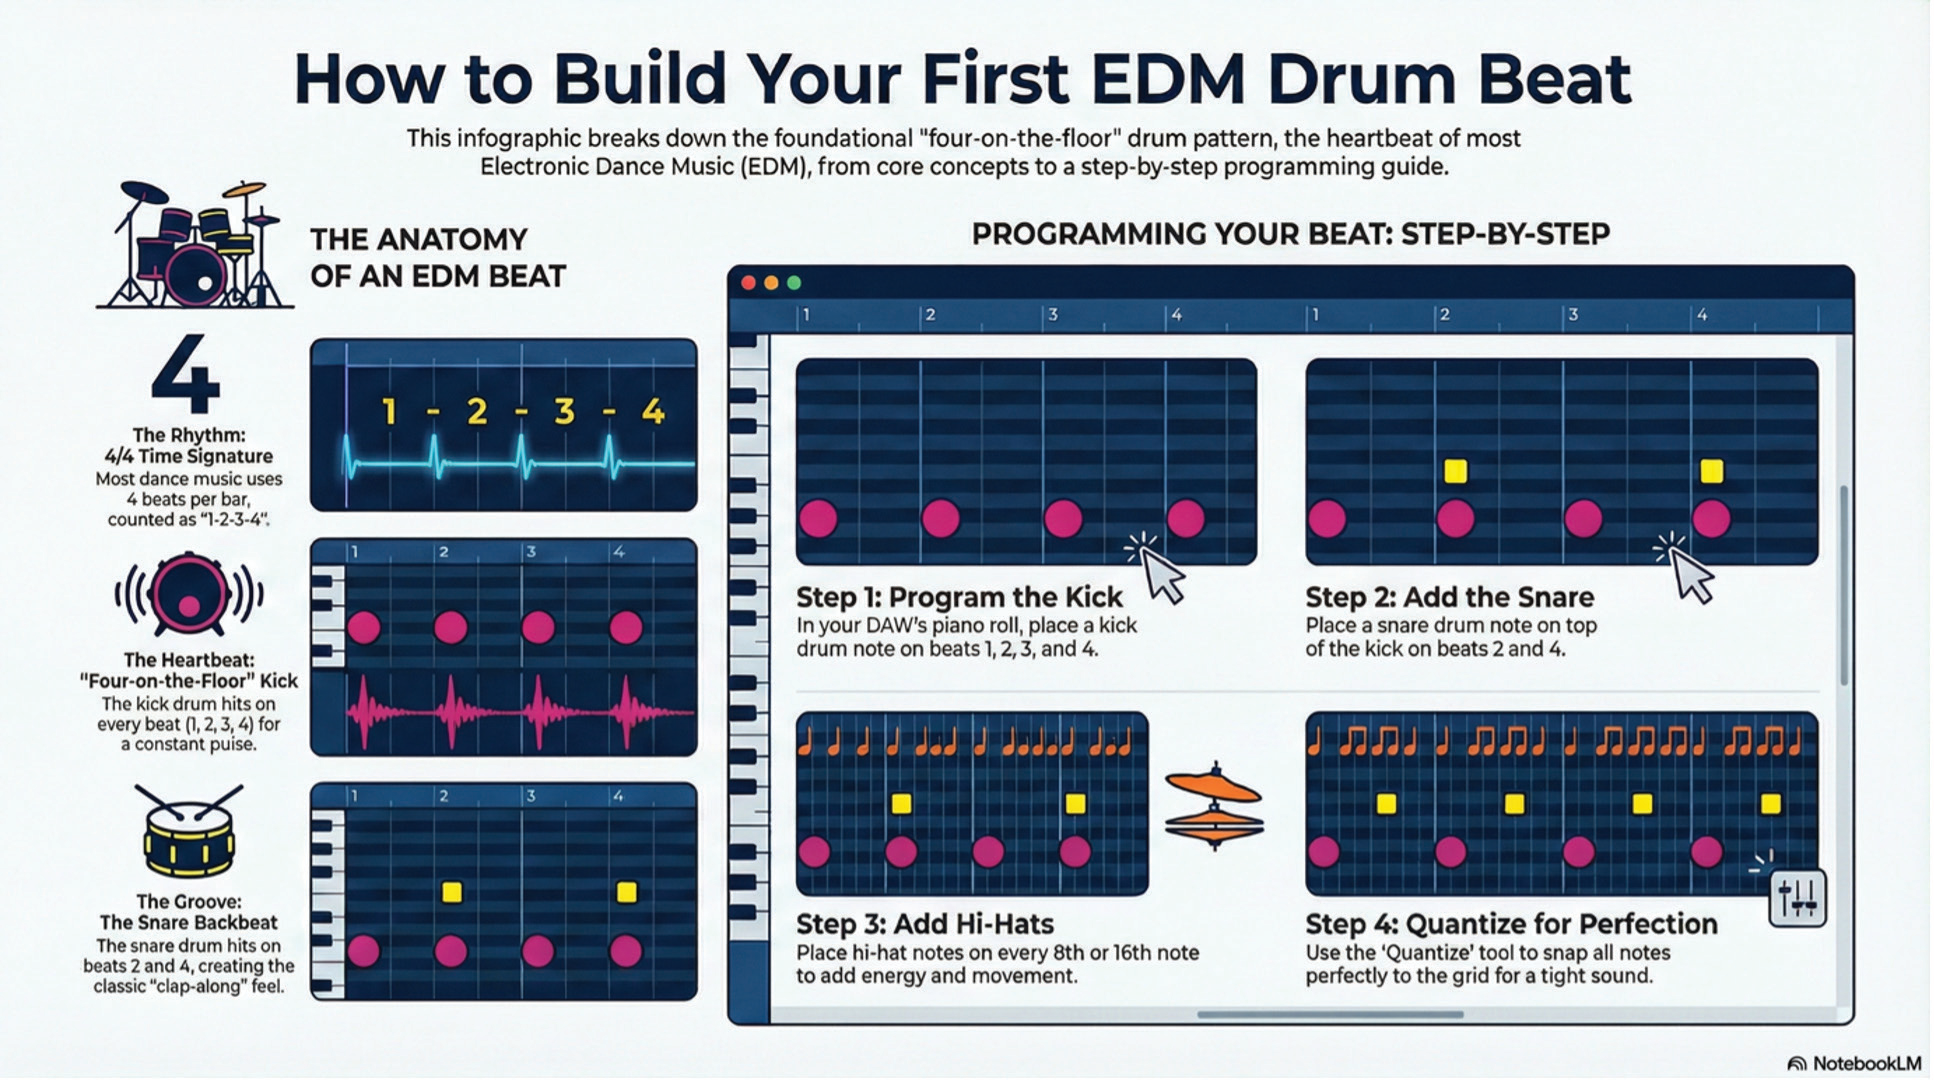
Once students understand this pattern, they can programme it themselves in a DAW within a few minutes. It’s an incredibly satisfying entry point because it sounds “real” almost immediately.
What tools do you need?
This is one of the best things about teaching EDM. You don’t need an orchestra, a set of ukuleles, or even a recording studio. All you need is a computer with a DAW (Digital Audio Workstation) and ideally a simple MIDI keyboard per student.
For DAWs, there are several options that work well in schools. Soundtrap is browser-based, which means no installation headaches and it works on Chromebooks. Reaper has an incredibly generous free trial and is a full professional DAW. Ableton Live Intro is free with many MIDI keyboards and is the industry standard for electronic music. And of course, if your school is in the Apple ecosystem, GarageBand and Logic Pro are excellent options.
MIDI keyboards are important because they allow students to play and record virtual instruments in real time. You can pick up basic 25-key controllers very affordably, and they make a massive difference to the hands-on feel of the course compared to clicking notes in with a mouse.
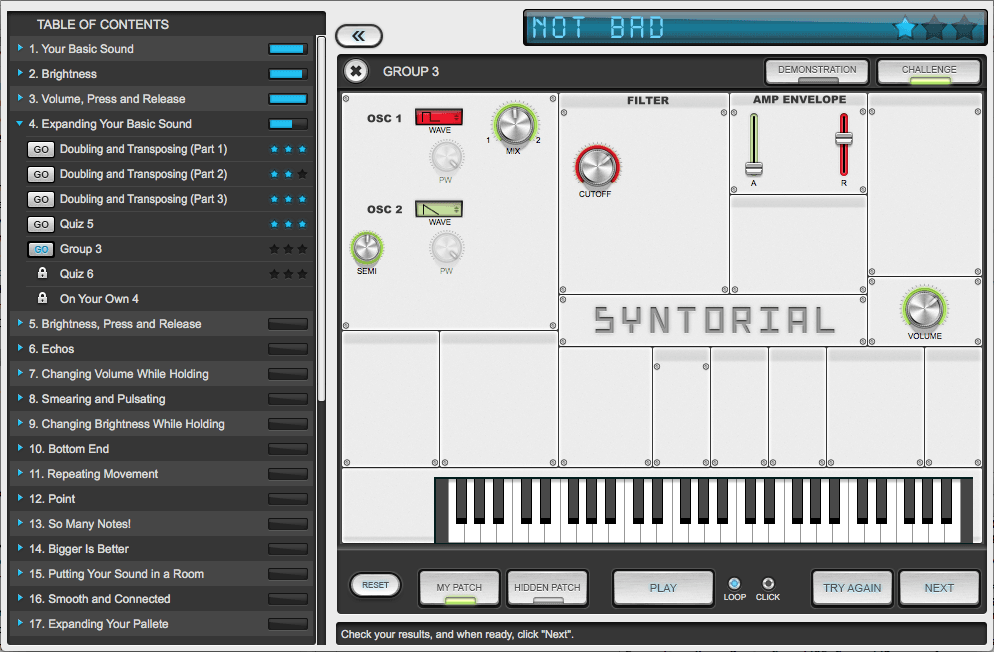
Beyond the hardware, the real tools are the virtual instruments built into these DAWs: synthesisers for creating electronic sounds, drum machines for programming beats, and effects like reverb and EQ for shaping and mixing. Students learn to use these just as they would learn to use any other instrument.
A resource to help
If this all sounds interesting but slightly overwhelming, I’ve been there. That’s exactly why I created How to Compose… EDM, a 40-lesson curriculum that takes you and your students through all of this step by step. It starts right at the beginning with active listening and identifying these structural elements, then progressively builds through drum programming, synthesis, bassline creation, arrangement and mixing across four phases.
Each lesson comes with a teacher guide, a student handout, and a video tutorial I’ve created demonstrating and explaining the key concepts. The videos mean you don’t have to be an EDM expert before you start. You and your students can learn together, which in my experience is actually one of the most powerful things about teaching this kind of material.
You can find the resource at www.learningideas.org. I’d love to hear from any teachers who give it a go.